Pastel Perfection: Square Nail Inspo for a Soft Summer Aesthetic. Indulge in the perfection of pastels with square nail inspiration that offers a soft and aesthetic summer look. Choose from a palette of pastel purples, mint greens, and baby pinks for a trendy, neutral look that complements any summer outfit. These simple yet pretty designs on short square nails provide a chic and elegant option for those who appreciate understated beauty.
Advertisement
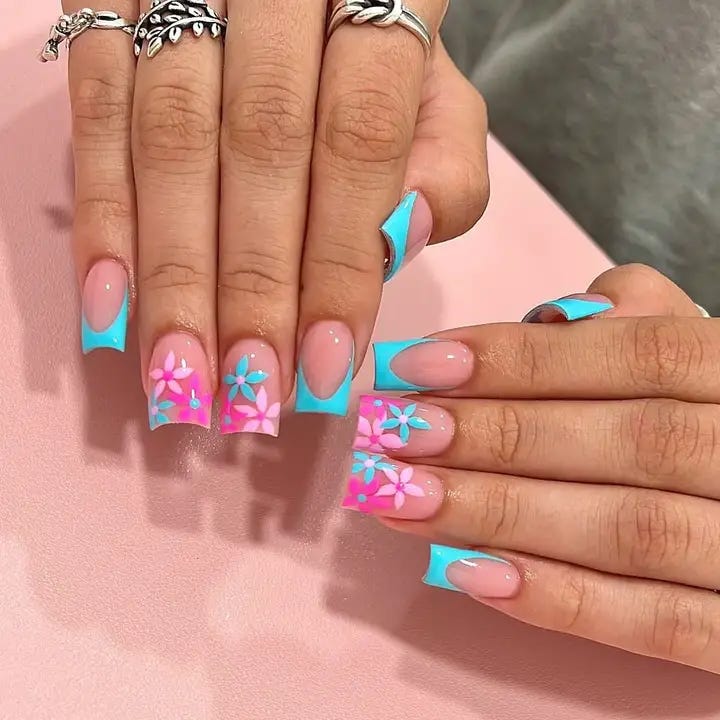
Bright, Bold, And Beachy
Imagine your nails reflecting the vibrancy of a summer beach party — baby blue serving as the sky, pink florals as the exotic flowers, and a hint of turquoise reminiscent of the ocean’s edge. It’s a design for the bold, the ones looking to make a splash with their nail art.
Advertisement
For these long square nails, here’s what you’ll need:
- A bright baby blue polish that makes a statement.
- Pink floral decals to add a touch of tropical charm.
- A turquoise polish for that eye-catching tip accent.
- A reliable topcoat to lock in the color and protect the decals.
Start with a gel base coat for a smooth canvas. Once cured, position the floral decals, then paint the tips with your turquoise polish. A steady hand and some low-tack tape can help achieve that crisp line. Finish with a topcoat to enhance the vibrancy and longevity of your manicure.
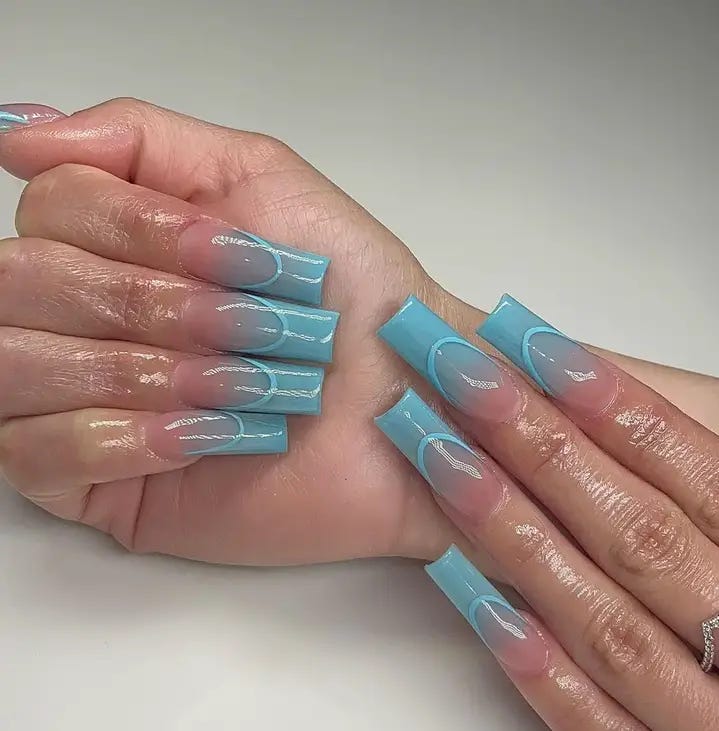
Minimalist Skyline
There’s elegance in simplicity, and a minimalist approach to summer nails can be just as impactful. A baby blue French tip on a sheer base is the epitome of chic, a style that transitions seamlessly from day to night.
Advertisement
To mirror this trendy and simple design, gather:
- A subtle, sheer gel for the base to let the natural beauty of your nails shine through.
- A baby blue polish for the French tip to draw a line of calm and class.
- A high-quality gel topcoat to ensure a smooth, long-lasting finish.
Apply a sheer gel base coat and cure under a lamp. For the French tips, use a fine brush dipped in baby blue polish to get that sharp, precise edge. Cure again, and seal with a gel topcoat for a gel long square look that lasts.
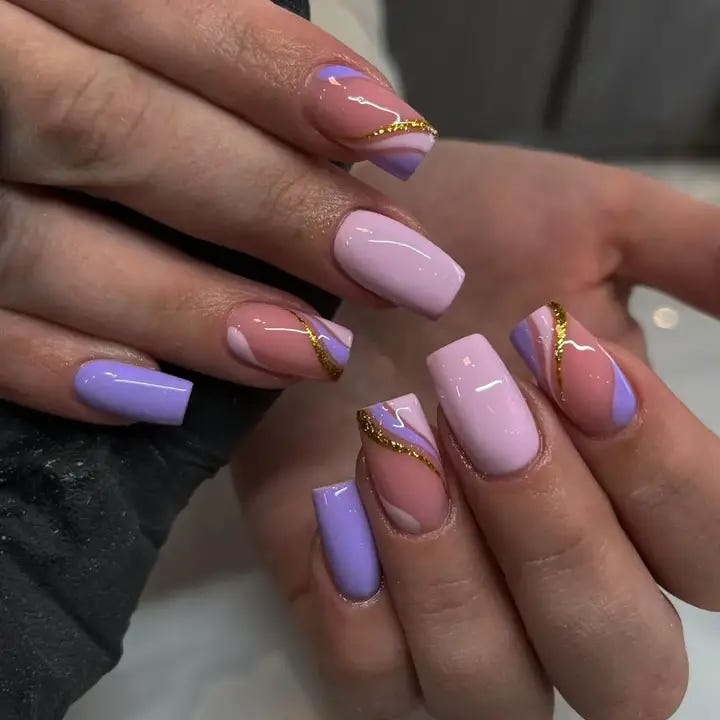
Lavender Luxe With A Golden Twist
Elegance meets edginess in this luxurious nail design. Lavender polish, sophisticated and serene, provides a lovely backdrop for a streak of gold that adds just the right amount of glamour. It’s the kind of design that would turn heads at a summer soirée, embodying both trendy and chic.
Advertisement
To bring this design to life:
- Choose a high-quality lavender polish for a smooth and pigmented base.
- Select a metallic gold striping tape or polish for the accent.
- Apply a glossy topcoat to achieve that coveted gel-like shine.
Start with two coats of lavender polish, then once dry, carefully place the gold striping tape across the nail or use a fine brush to paint the golden streak. Finish with a topcoat to seal and add that glassy finish.
Neon Graffiti: Urban Art At Your Fingertips
For those who dare to be bold, this nail design screams vibrant and unique. A blend of hot pink and neon yellow, shaped into abstract graffiti art, makes for a statement manicure that’s as lively as a street art mural. It’s the perfect accessory for anyone looking to showcase their dynamic personality and creative spirit.
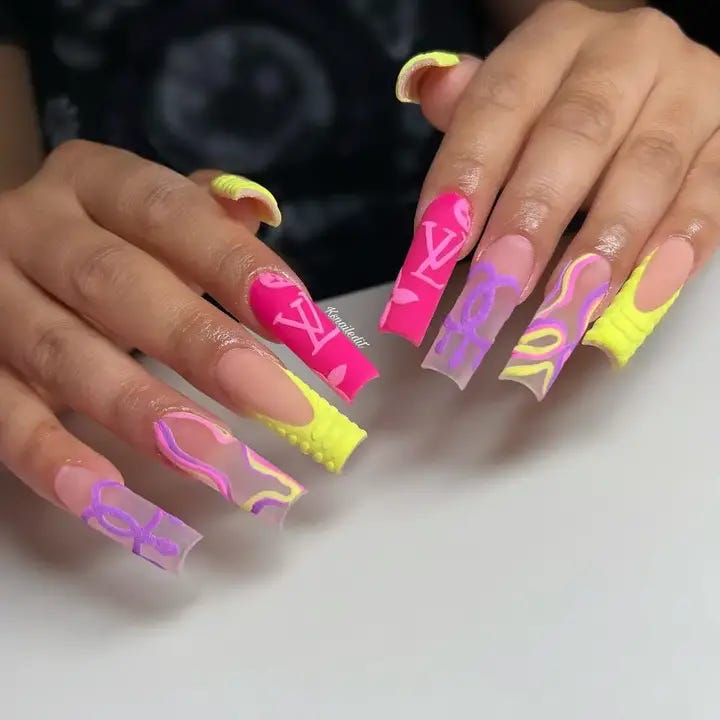
Gather these essentials:
- Vivid neon nail paints in pink and yellow.
- A thin art brush to create those sharp lines and shapes.
- A matte topcoat to contrast the bright neon colors.
Paint your base with a nude polish, then with your art brush, create abstract neon designs. Don’t strive for perfection; the beauty is in the irregularity. Matte it out with a topcoat to let the neon colors stand out starkly.
Melted Sunset: A Dripping Color Fantasy
The beauty of a sunset is captured on your nails with this dripping color design. It’s as if the colors of the sky at dusk — rich oranges and pinks — are melting right over the horizon. This gel long square design is for those who love a dramatic, artistic look that’s both inspo and aesthetic.
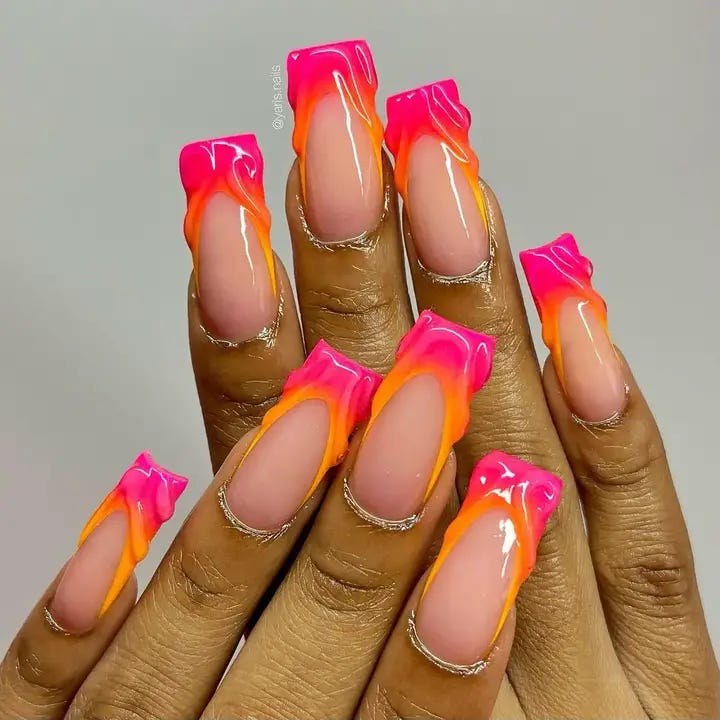
Here’s what you need:
- A nude base polish to start.
- Gel polishes in orange and pink to create the drip effect.
- A fine-tip brush to control the gel for precision.
Apply your nude base and let it set. Then, using the fine-tip brush, apply the gel polishes in a drip pattern starting from the cuticle down. The key is to let the colors blend slightly to mimic the fluidity of a melting sunset. Cure under a lamp and then apply a gel topcoat for that everlasting shine.
Soft Pink Splendor
Here’s a design that speaks volumes with subtlety. The soft pink base paired with delicate magenta accents creates a look of understated elegance, perfect for those who prefer their style statement to whisper rather than shout. It’s a design that combines pretty with professional, ideal for both a day at the office and a night on the town.
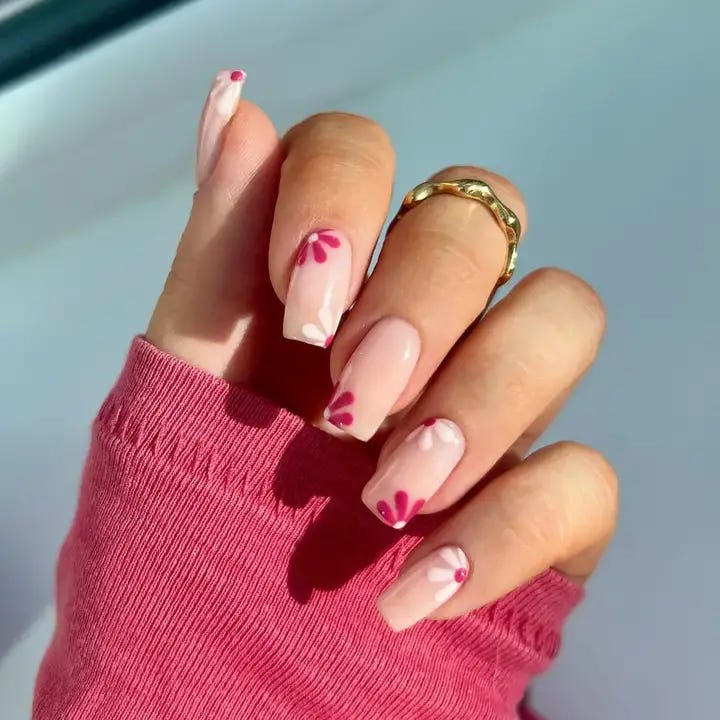
Creating this look involves:
- A blush pink polish for a graceful base.
- Magenta polish for the artful accents.
- A detail brush to achieve those fine, petal-like strokes.
- A glossy topcoat for that perfect, smooth finish.
Apply two coats of the pink polish, then use the detail brush to add magenta strokes. Finish with the topcoat to give it a professional gleam.
Jeweled Elegance
If you’re looking to add some sparkle to your nails, this design is a true gem. The intricate jeweled accents, set against a duo-chromatic base, exude luxury. It’s a style that wouldn’t be out of place on the red carpet, designed for those who embrace the bold and the beautiful.

You’ll need:
- A duo-chrome polish that shifts with the light.
- An assortment of nail jewels and a strong adhesive to set them in place.
- A topcoat that can hold the extra weight of the jewels without chipping.
Start with the duo-chrome base, then carefully place the jewels where you wish and use adhesive to secure them. Seal with a topcoat, applying it around the jewels to avoid dulling their sparkle.
Cherry Blossom Delight
For a manicure that’s a breath of spring, this design with its floral 3D art and crisp white accents is just the ticket. It’s a fresh take on the French tip, adorned with cherry blossom appliqués that add a touch of the aesthetic to your nail game.
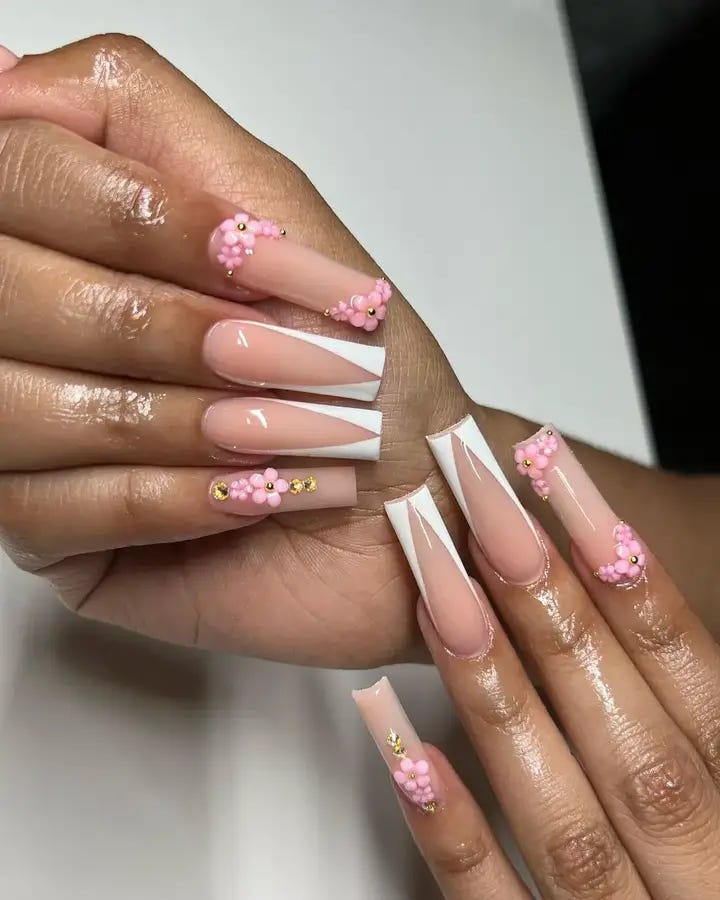
This delightful look requires:
- A soft nude polish for the base.
- White polish for the French tips.
- Pink 3D flowers and golden micro-beads to bring the blossoms to life.
- A topcoat to ensure the 3D elements stay secure.
After applying the nude base and white tips, affix the 3D flowers and micro-beads to mimic the center of the blossoms. Once arranged, apply a topcoat to keep everything in place.
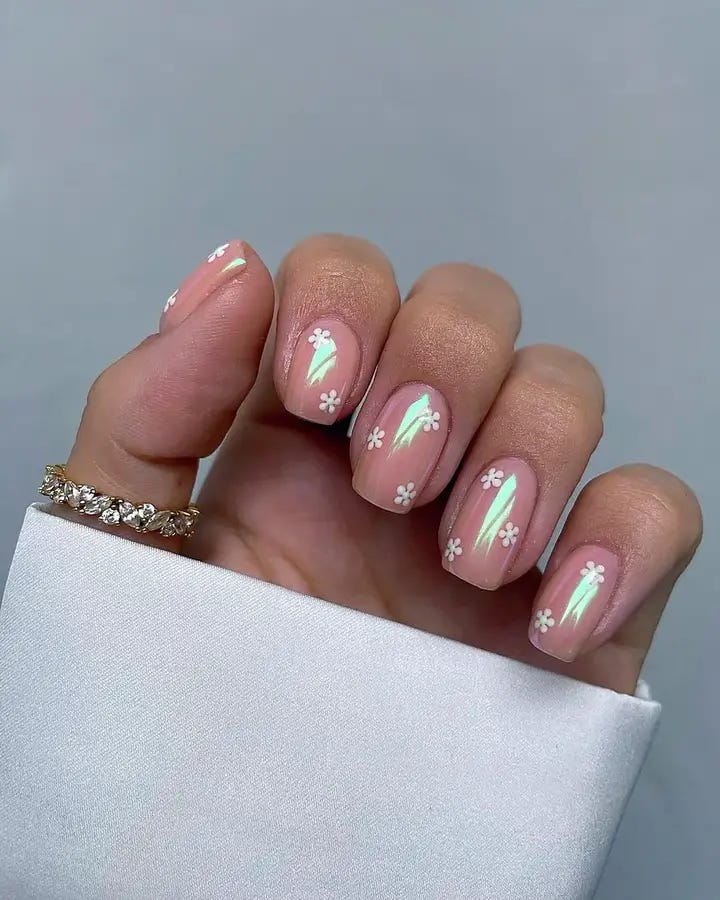
Whimsical Floral Impressions
This nail design is like a watercolor painting brought to life, featuring delicate blue floral accents over a sheer pink base. It’s a romantic and aesthetic approach to nail art, perfect for those sunny spring afternoons spent in blooming gardens. The splash of greenery adds a fresh touch, embodying the essence of pastel springtime beauty.
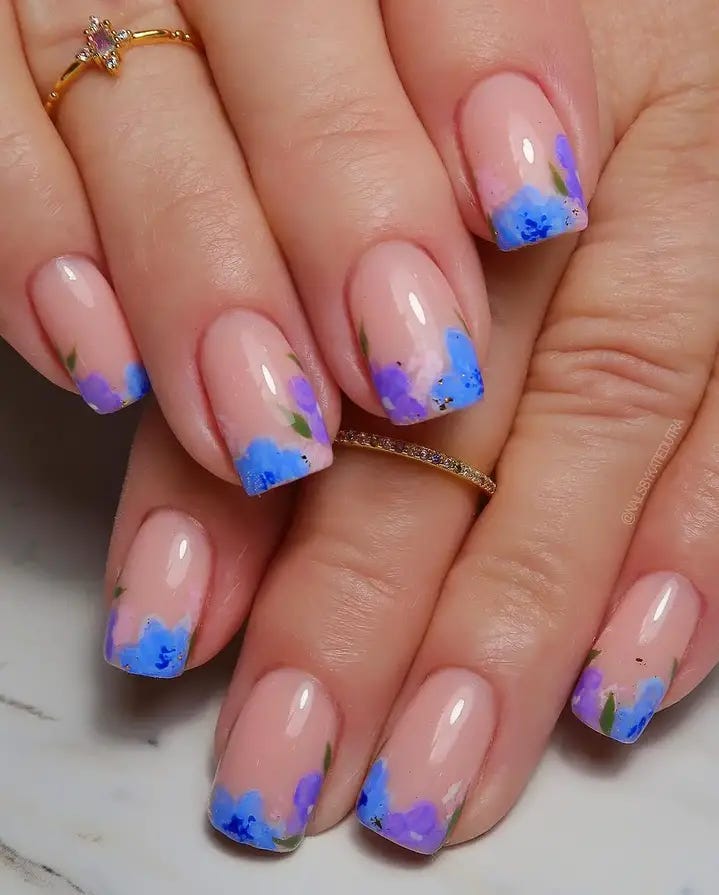
To achieve this look:
- Opt for a translucent pink polish that gives your nails a healthy glow.
- Use watercolor or thin, diluted acrylic paints to create the soft floral patterns.
- A fine brush will be essential for painting on those petite petals and leaves.
- Finish with a clear topcoat to protect your artwork and add a natural shine.
Sculptural Metallic Edges
This design transforms nails into modern art, combining sleek teal with metallic adornments. It’s unique and bold, a statement piece that melds the world of high fashion and avant-garde artistry. This design is for the daring, for those who view their nails as a canvas for personal expression.
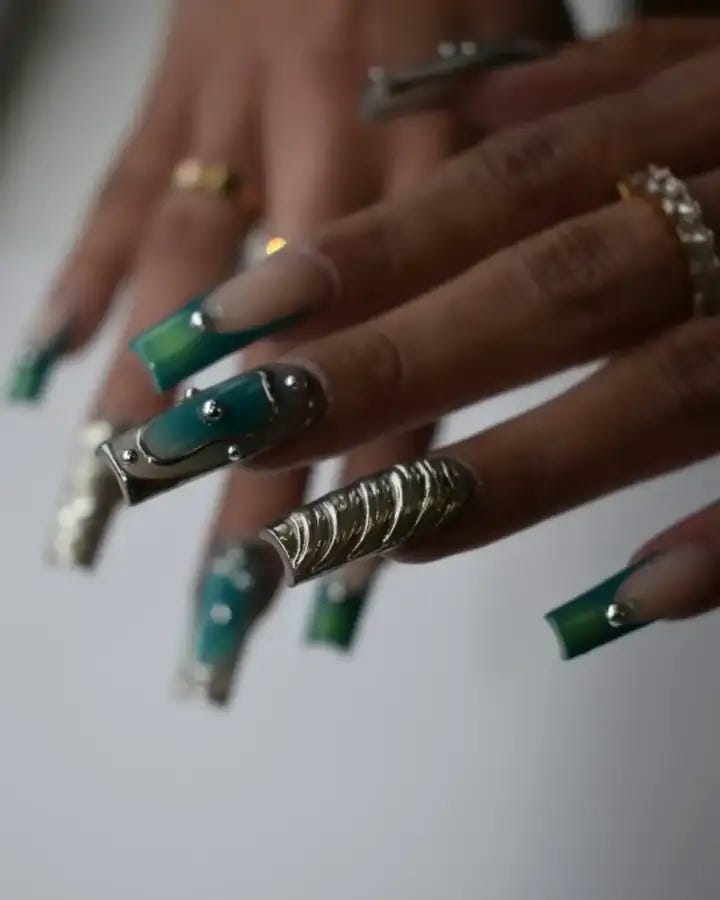
You’ll need:
- A deep teal polish for the bold base color.
- Metallic nail tape or foil for the edgy highlights.
- Small rhinestones or studs to add dimension and texture.
- A strong adhesive to secure your metallic elements.
- A topcoat to set everything in place, ensuring durability through day-to-day activities.
Minty Fresh With Golden Accents
For a look that’s both fresh and luxurious, this design pairs soft mint with delicate gold accents, crowned with tiny pearls for an added touch of elegance. It’s the perfect blend of simple and chic, suited for a day at work or a weekend brunch.
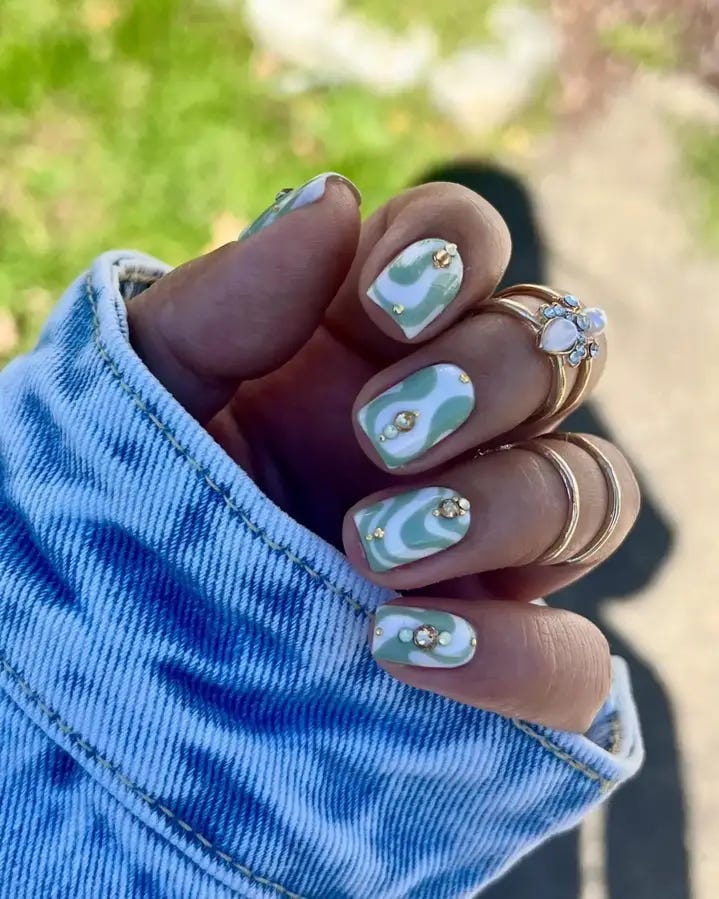
The essentials for this design:
- A minty nail polish for a cool, refreshing base.
- Gold foil or striping tape to create thin, elegant lines.
- Tiny pearls and a dot of nail glue to add a three-dimensional effect.
- A glossy topcoat to give your nails a polished, finished appearance.
Sunset Florals
Capturing the warmth of a summer sunset, these nails feature a soft blush base, with cheerful floral accents in shades of tangerine and pink. It’s an inviting palette that combines the whimsy of flower fields with the stunning hues of the evening sky.
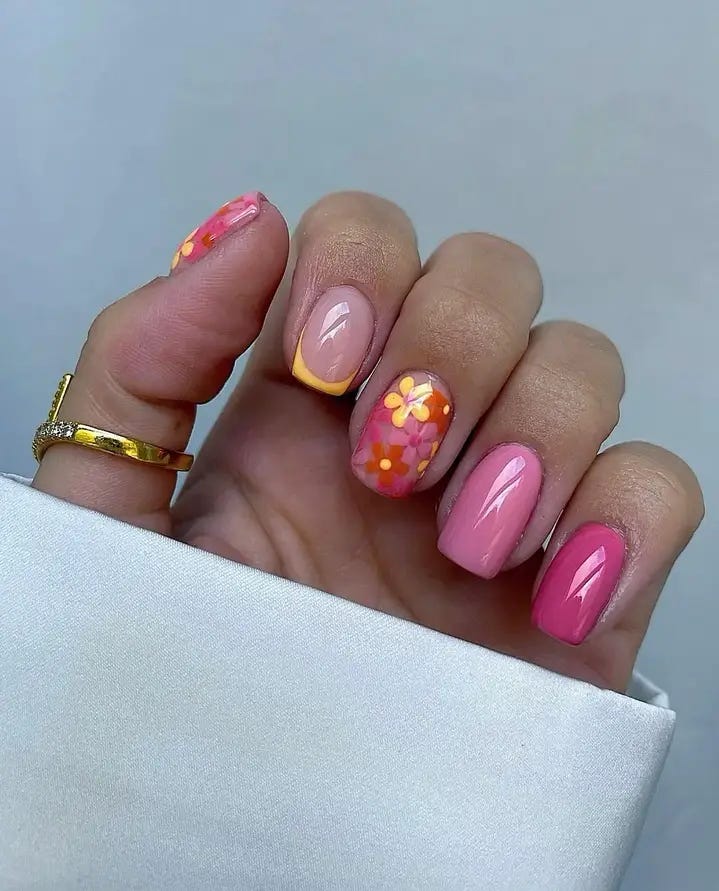
To recreate this look:
- Start with a sheer pink polish that mimics the natural color of your nails for a clean, fresh base.
- Use small brushes to add abstract floral patterns in warm orange and pink tones.
- Add a few delicate touches of green for leaves to give depth and contrast.
- Seal with a glossy topcoat to bring out the vibrancy of the colors.
Dainty Daisy Chains
Here we have an ode to the classic daisy, a symbol of purity and new beginnings. The soft pink base serves as a delicate background for the white daisy chain designs, with subtle green accents that evoke the freshness of spring.
To achieve this design:
- Apply a pale pink polish for a tender, translucent background.
- With a fine brush or dotting tool, create small white daisy petals, adding a yellow dot for the center.
- Introduce hints of green for the stems and leaves.
- A clear topcoat will protect the design and provide a professional finish.
Blue Blossom
Bold and playful, this design brings a pop of blue against a crisp white tip, reminiscent of the clear summer sky dotted with vibrant blue flowers. It’s a twist on the French manicure, with a floral fantasy that’s sure to stand out.
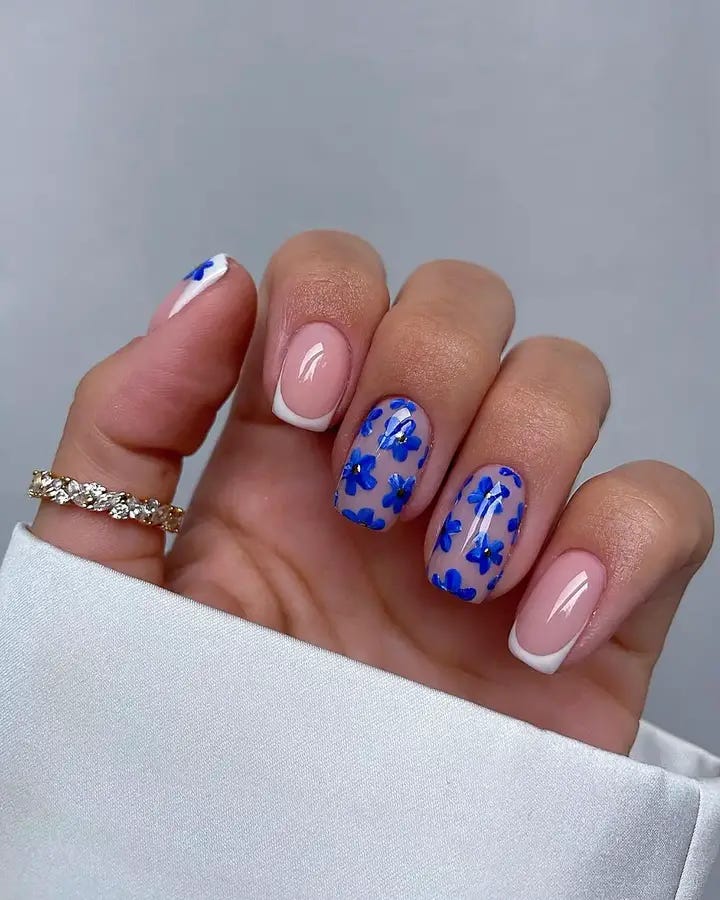
To bring this design to life:
- Use a natural nude polish as a base to enhance the white tips and blue flowers.
- Paint the tips white, then use a small brush to create the blue floral accents.
- A topcoat adds shine and ensures the design lasts through all your summer adventures.
Pastel Playtime
This design takes a playful approach with a pastel palette, incorporating shades of mint, lilac, and soft pink. The simple yet charming flower on one nail adds a focal point, while the alternating colors keep the look fun and lighthearted. It’s perfect for someone who loves a bit of variety and a pop of color without overwhelming their style.
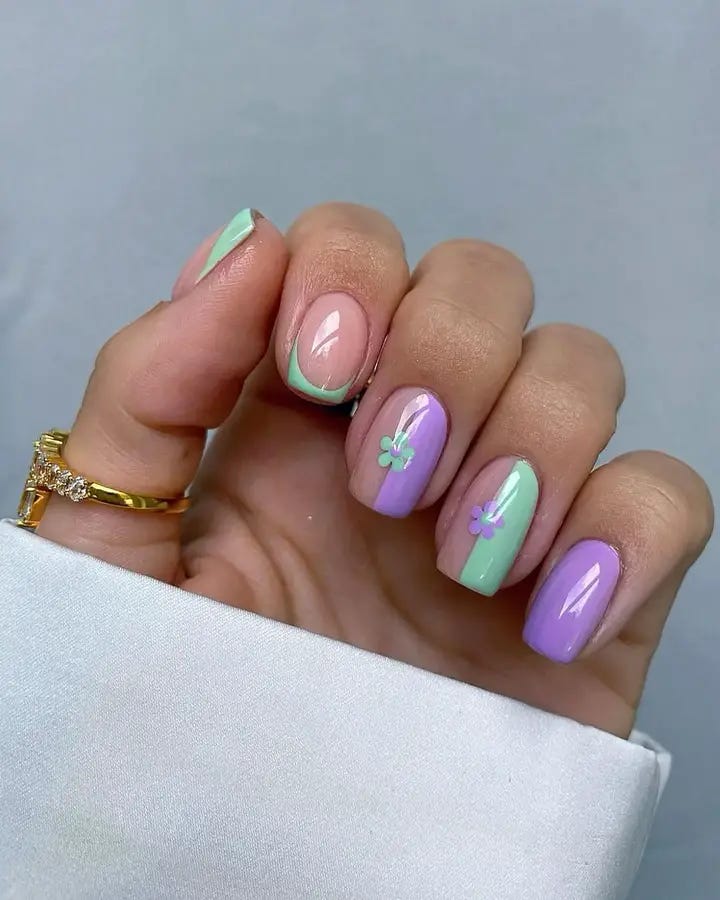
To get this look:
- Select your favorite pastel polishes in mint, lilac, and pink.
- Use a fine brush to paint a small, simple flower for a touch of whimsy.
- Finish with a glossy topcoat to protect the design and give it a lovely shine.
Slate Sophistication
Here’s a design that’s all about understated elegance. The cool, muted tones of slate gray offer a modern twist on the traditional nail color, creating a look that’s both sophisticated and trendsetting. It’s a versatile style that works well for any occasion, from a business meeting to a night out.
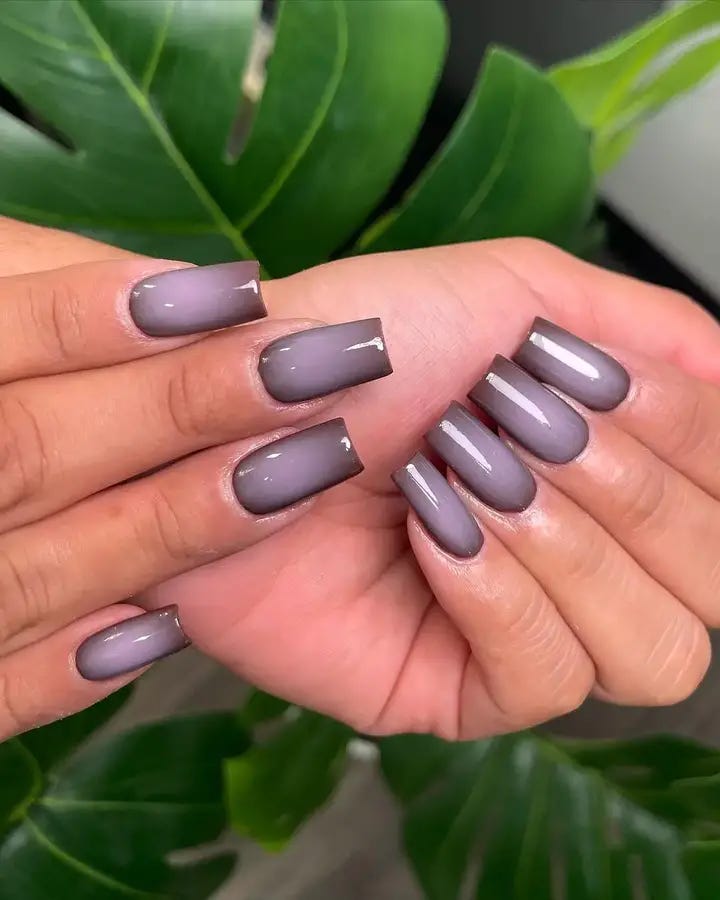
For this chic design:
- Choose a gray polish with a hint of purple to add depth and interest.
- Apply two coats for full coverage and a rich color.
- A glossy topcoat adds the perfect finish, enhancing the color’s depth.
Raindrop Reverie
This unique nail design captures the essence of a serene rainy day. The soft beige and muted lime hues serve as a canvas for the three-dimensional raindrop accents, creating a tactile experience that is both visually interesting and unexpected.
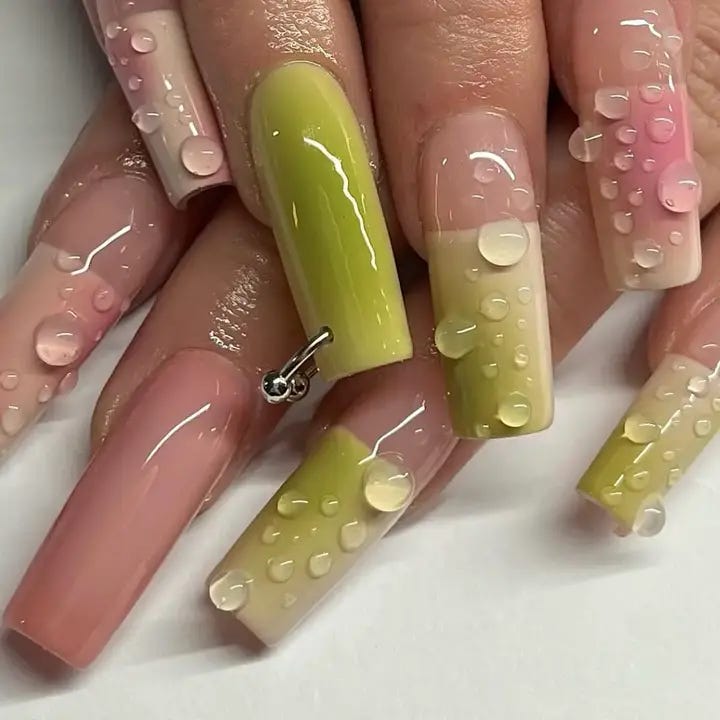
To achieve this artistic look:
- Choose two contrasting colors like beige and muted lime for a base coat, applying them in alternating patterns or color-blocked sections.
- Use a clear gel to form the droplets, carefully placed to give the illusion of fresh rain.
- Apply a glossy topcoat over the base while leaving the droplets matte for a realistic wet-look finish.


0 Comments