Natural Nails with Patriotic Chrome Accents. For those who prefer to keep their nails natural, add a modern twist for the 4th of July with chrome accents. Apply silver chrome stripes or tips that reflect the American flag’s colors subtly. This look is stylish and contemporary, offering a minimalist yet festive nod to the holiday, suitable for both daytime picnics and evening fireworks.
Spirals And Stripes Of Festivity
This playful design offers a vivid carousel of red, white, and blue, with spirals that draw the eye in an enchanting dance, making it a perfect choice for those wanting to celebrate with a twist of fun. The art of using contrasting matte and glossy finishes adds depth and intrigue to each nail, showcasing a meticulous attention to detail. The stars on a subtle white base are a nod to traditional patriotic symbols while keeping the overall look fresh and cute.
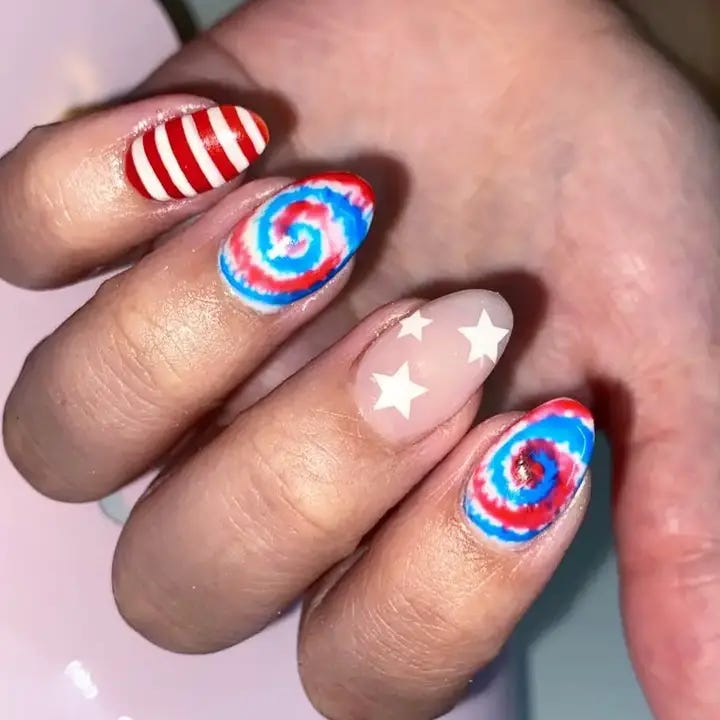
- Base Polish: Sally Hansen Double Duty
- Colors: ‘Cherry Red’, ‘Midnight Blue’, and ‘Snow White’
- Top Coat: Essie Matte About You for the matte effect and Seche Vite for the glossy sections
- Tools: Dotting tools, fine brushes, and masking tape
Utilize masking tape to create clean lines for the stripes and a fine brush for the swirls and stars. Experiment with both matte and glossy top coats to emphasize different elements of the design.
- Prepare Your Nails: Apply a base coat to protect your nails.
- Color Base: Paint the thumb and pinky in glossy red, and the ring finger in white for the base of the stars.
- Design Details: Use a fine brush to create blue and red spirals on the middle fingers. Add white stars to the ring finger using a dotting tool.
- Finish Up: Apply a matte top coat on the spiraled nails and a glossy coat on the red and starry nails for a mixed finish.
Stars And Stripes Forever
This set epitomizes the classic American flag motif with a stylish twist suitable for any 4th of July event. The alternating pattern of stars and stripes across different nails captures the essence of the American spirit. The use of shiny and matte finishes adds a contemporary edge, making it a simple yet sophisticated choice.
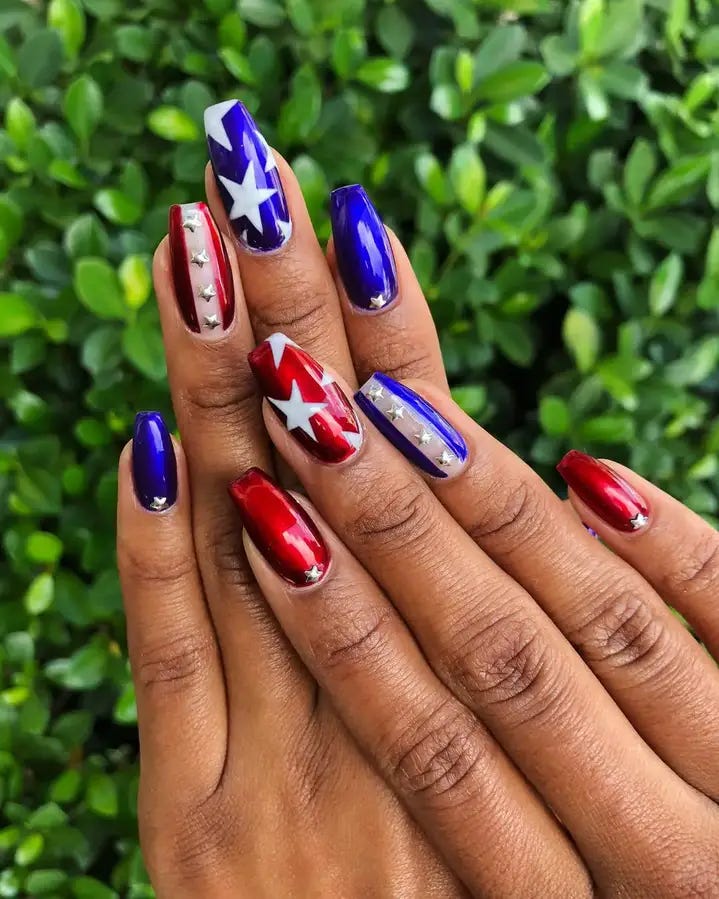
- Base Polish: Essie Here to Stay Base Coat
- Colors: ‘Flag Red’, ‘Patriotic Blue’, and ‘White Stars’
- Top Coat: Matte and glossy top coats for varied textures
- Tools: Star stickers, striping tape
For a crisp look, use striping tape for the lines and pre-made stickers for the stars. This helps achieve precise and clean designs, especially on shorter nails.
- Prepare Your Nails: Start with a base coat to ensure smooth application.
- Apply Colors: Design each nail according to the stripe or star pattern planned. Use blue and red as base colors on alternate nails.
- Add Details: Place star stickers on blue nails and use striping tape to create white and red stripes on others.
- Finish Up: Apply a matte top coat over the stars and a glossy coat on the striped nails for a dynamic look.
Varied Textures And Patriotic Designs
This nail art design combines various textures and techniques to create a stunning visual array that captures the patriotic spirit with a modern twist. The use of glossy red polish contrasts beautifully with the intricate designs, including detailed flags and celebratory bursts. This look is perfect for those who enjoy a mix of simple and complex elements in their manicure, allowing each nail to tell part of the story of American pride.
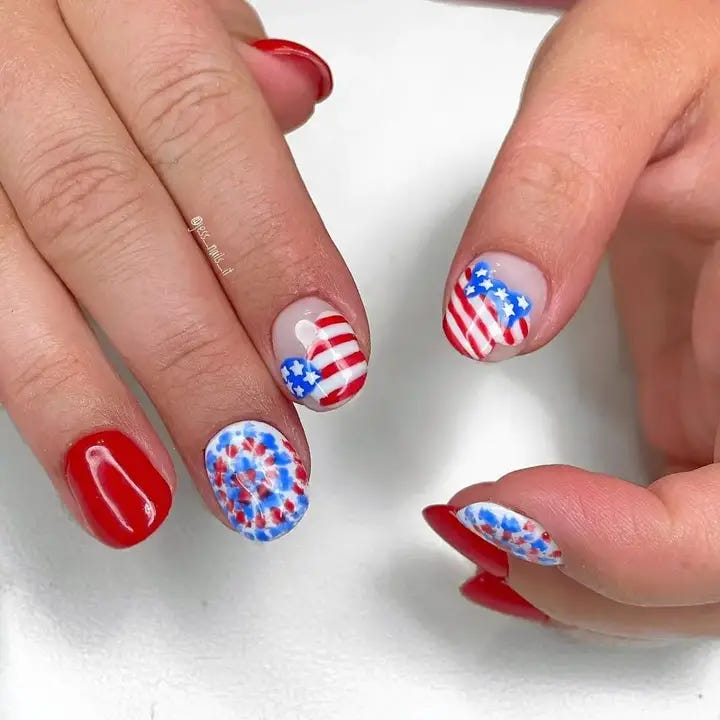
- Base Polish: CND Stickey Base Coat
- Colors: ‘Classic Red’, ‘Pure White’, and ‘Deep Blue’
- Top Coat: Glossy and matte top coats for texture variation
- Tools: Striping brush, dotting tools, stencil for stars
Use stencils to achieve precise stars and stripes. A glossy top coat over the red nails will make them pop, while a matte finish on the patterned nails will keep the focus on the intricate designs.
- Prepare Your Nails: Apply a sticky base coat to enhance polish adherence.
- Apply Base Colors: Paint alternate nails with glossy red and leave others white for detailing.
- Design Details: On white nails, use a striping brush to paint stripes and a dotting tool to create star patterns.
- Finish Up: Apply a glossy top coat on red nails and a matte coat on decorated nails to accentuate the designs.
Elegance In Simplicity
This design offers a sophisticated approach to USA nails with its clean, crisp lines and uncluttered aesthetic. The predominance of white space enhances the vivid blue stars and striking red stripes, making this manicure ideal for those who prefer elegance and minimalism in their nail art. This style is particularly suitable for formal occasions or as a subtle expression of patriotism.
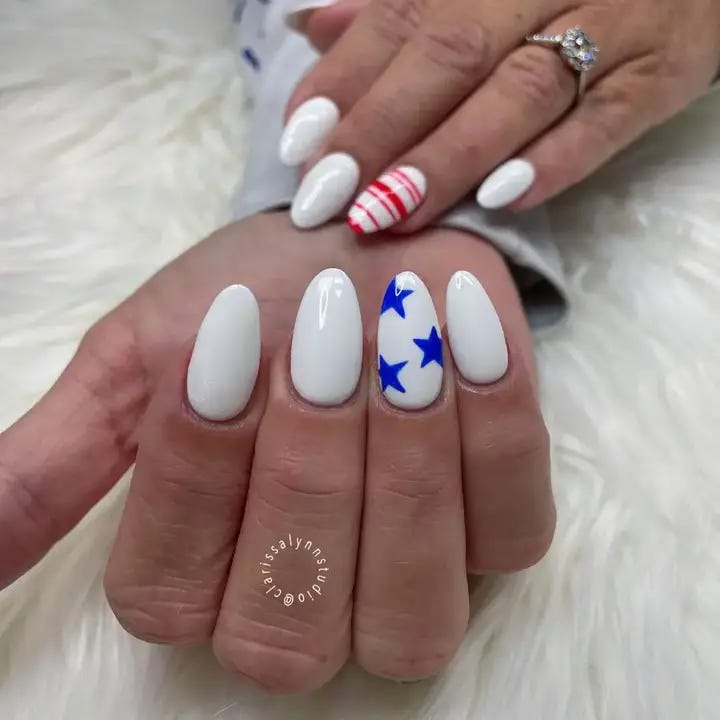
- Base Polish: Essie Here to Stay Base Coat
- Colors: ‘Stark White’, ‘Navy Blue’, and ‘Fire Engine Red’
- Top Coat: Essie Good to Go
- Tools: Fine brush for detailing, star-shaped decals
Apply star decals for a clean and uniform appearance. Use a fine brush to draw thin stripes, ensuring they are crisp and even.
- Prepare Your Nails: Start with a base coat to protect your nails and ensure a smooth application.
- Apply Base Color: Paint all nails with a stark white base to highlight the subsequent designs.
- Add Details: Place blue star decals on select nails and paint thin red stripes on others.
- Finish Up: Seal with a fast-drying top coat to add shine and longevity to your manicure.
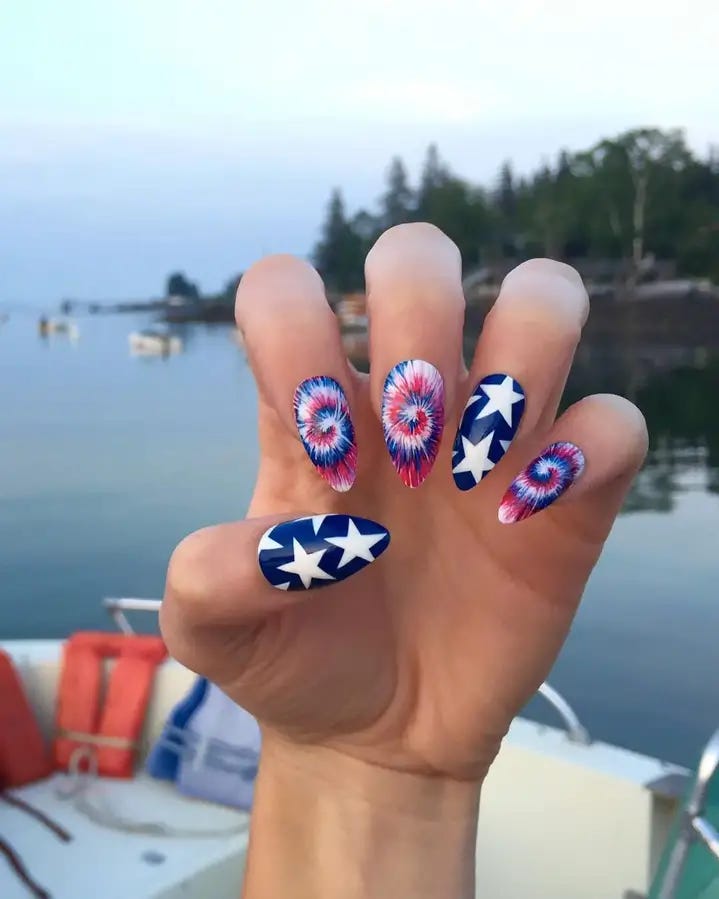
Dynamic And Vibrant Artistic Flair
This design is a true artwork, blending dynamic color bursts with iconic star motifs to create a captivating visual effect. The explosive patterns mimic fireworks, making this manicure a celebration in itself. Ideal for those who want their nails to be a centerpiece of their 4th of July ensemble, this look combines art and patriotism in a bold and beautiful way.
- Base Polish: OPI Natural Nail Base Coat
- Colors: ‘Electric Blue’, ‘Signal Red’, and ‘Optic White’
- Top Coat: High-gloss finish to enhance vibrancy
- Tools: Sponge for dabbing, thin brushes for detail work
Use a sponge to softly blend the colors on the nail, creating a burst effect. Detail brushes will help refine the star designs and sharp lines.
- Prepare Your Nails: Apply a base coat to protect and smooth your nails.
- Apply Base Colors: Use ‘Optic White’ as a base for nails that will feature color bursts.
- Create Designs: Dab ‘Electric Blue’ and ‘Signal Red’ on a sponge and press onto the nails to create a burst effect. Use a fine brush to add stars and detailed elements.
- Finish Up: Apply a high-gloss top coat to make the colors pop and add durability to your festive look.
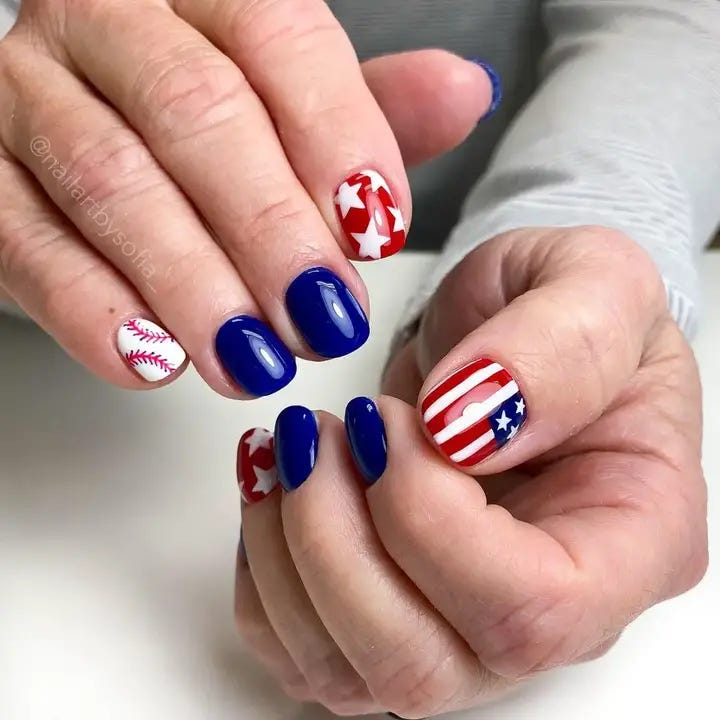
Sports And Stars
This design perfectly marries the love for sports with patriotic fervor, featuring glossy blue nails interspersed with creative depictions of baseballs and American flags. The vibrant blue provides a deep, rich backdrop for the intricately painted white stars, while the red and white striped nail with a subtle star accent pays homage to the national flag. Ideal for sports enthusiasts looking to show their pride during national holidays or sporting events.
- Base Polish: OPI Nail Envy
- Colors: ‘Deep Sea Blue’, ‘Pure White’, and ‘Classic Red’
- Top Coat: Glossy top coat for a striking finish
- Tools: Thin brush for details, stencil for stars
Precision is key for the flag stripes and baseball stitches. Use a thin brush for detailed work and stencils to ensure uniform stars.
- Prepare Your Nails: Apply a strengthening base coat to protect your nails.
- Apply Base Colors: Paint most nails in deep sea blue for a bold base.
- Design Details: On select nails, use a white polish to create baseball patterns and red and white for flag designs.
- Finish Up: Cover with a glossy top coat to enhance the colors and ensure longevity.
Classic Americana
This delightful set brings a playful twist to classic American symbols, incorporating cherries, gingham patterns, and fluid stripes alongside traditional stars. The designs are lively and colorful, perfect for a fun-filled 4th of July barbecue or a casual summer day out. Each nail serves as a canvas for a different element of Americana, making this manicure a true celebration of American culture.
- Base Polish: Essie All-in-One Base Coat
- Colors: ‘Cherry Red’, ‘Sky Blue’, and ‘Alabaster White’
- Top Coat: Essie Gel Setter for a plump, glossy finish
- Tools: Detailing brush, dotting tools
For the gingham pattern, use a thin brush to carefully paint intersecting lines. Dotting tools are great for the cherries to ensure they come out looking plump and vibrant.
- Prepare Your Nails: Begin with an all-in-one base coat to smooth and protect.
- Apply Base Colors: Use white as a base for patterned nails and blue for the starry designs.
- Add Details: Hand-paint cherries, gingham checks, and fluid stripes using corresponding colors.
- Finish Up: Apply a gel-like top coat for a voluminous and shiny finish.
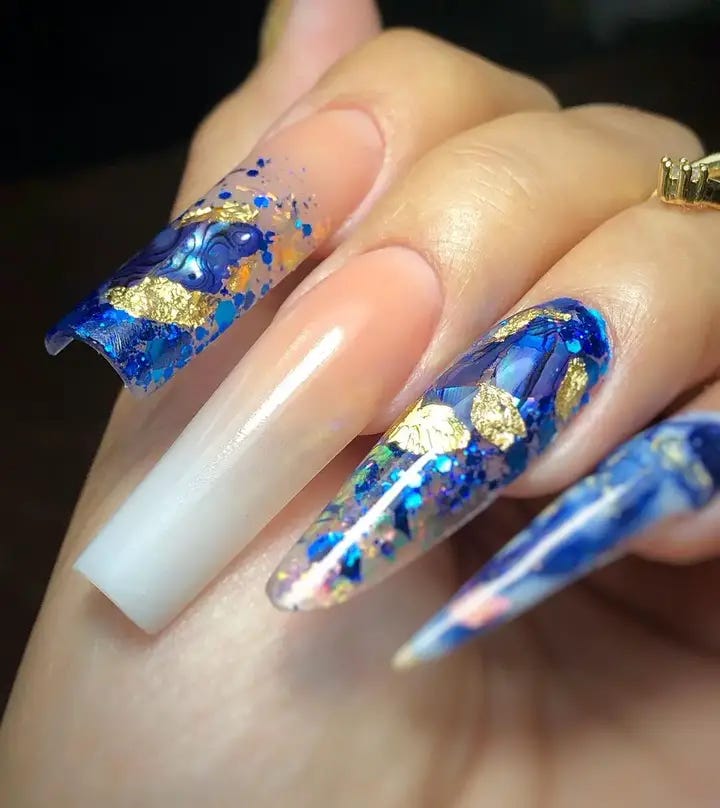
Artistic Expression With Luxury
This luxurious design combines deep blue and gold flakes to create a dramatic and artistic interpretation of night skies or deep ocean vistas. The use of clear gradients and floating gold accents over blue creates an almost celestial or oceanic feel, perfect for those who wish to make a bold fashion statement or celebrate special occasions with a touch of opulence.
- Base Polish: OPI Natural Nail Base Coat
- Colors: ‘Midnight Blue’ and transparent polish
- Accents: Gold leaf flakes
- Top Coat: High-gloss top coat for a seamless finish
- Tools: Tweezers for gold leaf, sponge for blending
Apply the gold leaf flakes with tweezers for precise placement. Use a sponge to softly blend the blue into the clear polish for a smooth gradient effect.
- Prepare Your Nails: Start with a base coat to protect your nails.
- Apply Base Colors: Begin with a base of midnight blue at the tips, fading to clear.
- Add Gold Flakes: Carefully place gold leaf flakes using tweezers for a luxurious look.
- Finish Up: Seal with a high-gloss top coat to enhance the depth and shine of the manicure.
Festive Flair With Star-Studded Blue
This vibrant design is all about celebration, featuring a deep blue background speckled with white and red stars that pop against the darker shade. The look captures the essence of a starry night sky during a festive firework display, making it ideal for celebratory occasions like the 4th of July or New Year’s Eve.
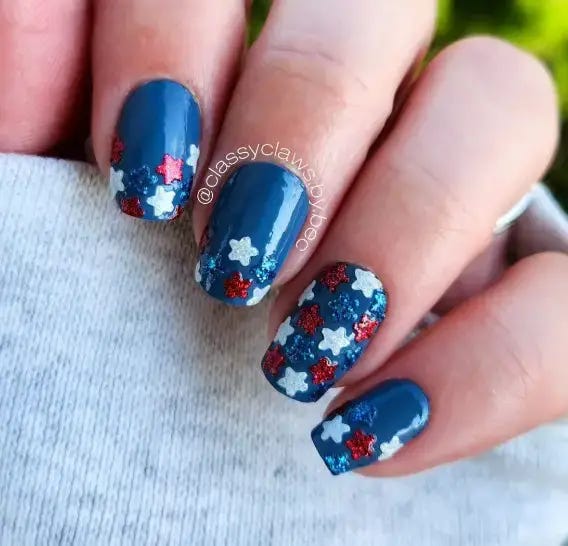
- Base Polish: OPI Natural Nail Base Coat
- Colors: ‘Navy Night’, ‘Snow White’, and ‘Rocket Red’
- Top Coat: High-gloss finish to make the colors stand out
- Tools: Star stamps or stencils, small sponge
Use star stencils for precise star shapes and a small sponge to dab on the red accents subtly, mimicking the random pattern of fireworks in the sky.
- Prepare Your Nails: Start with a base coat for protection and enhanced polish adherence.
- Apply Base Color: Paint nails with a deep blue to serve as the night sky.
- Add Stars and Accents: Place white stars using stencils, then sponge on red for a burst effect.
- Finish Up: Cover with a high-gloss top coat for durability and extra shine.
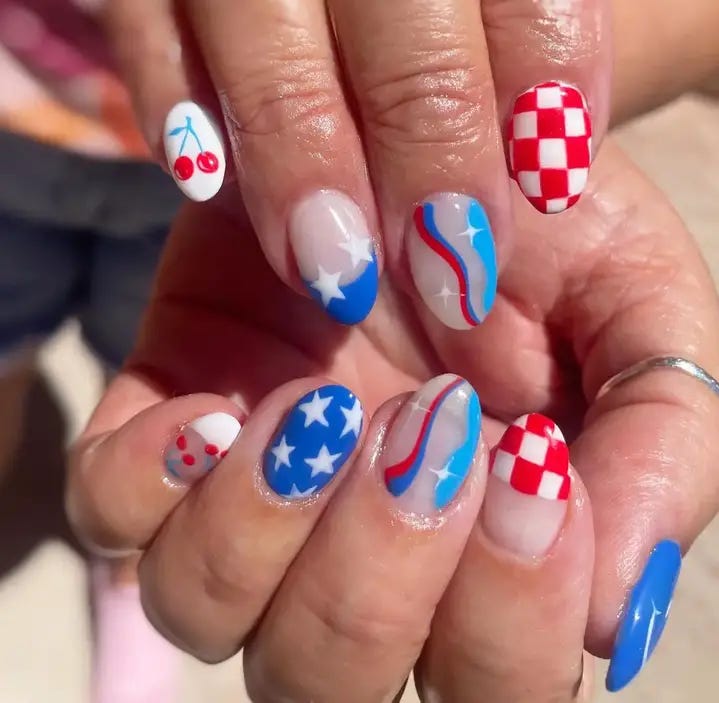
Playful Mix Of Icons And Patterns
This eclectic and playful nail design mixes various icons and patterns, including cow spots, cherries, and abstract stripes, all unified by a patriotic color scheme. Each nail features a different design, making this manicure a fun and quirky expression of individuality, perfect for casual gatherings or as a conversation starter at any event.

- Base Polish: Sally Hansen Miracle Cure
- Colors: ‘Classic Red’, ‘White Out’, and ‘Blue Ribbon’
- Top Coat: Matte top coat for a contemporary finish
- Tools: Variety of brushes and dotting tools
Embrace creativity with this design. Use different tools for each pattern to achieve a unique look on every nail. The matte finish will tie the designs together and give a modern appeal.
- Prepare Your Nails: Apply a strengthening base coat to protect your nails.
- Apply Base Colors: Choose a base color for each nail depending on the design planned.
- Add Details: Create each design using specific tools; for example, use a dotting tool for cherries and a fine brush for stripes.
- Finish Up: Apply a matte top coat to unify the designs under a chic, non-reflective finish.
Spectacular Sparkle And Bold Designs
This stunning set exemplifies a bold celebration of the 4th of July with its combination of deep blue glitter, vibrant red, and pristine white nails, each adorned with striking blue stars. The stiletto nails enhance the dramatic effect, making this style perfect for those looking to make a statement at festive gatherings or events where a touch of glamour is desired.
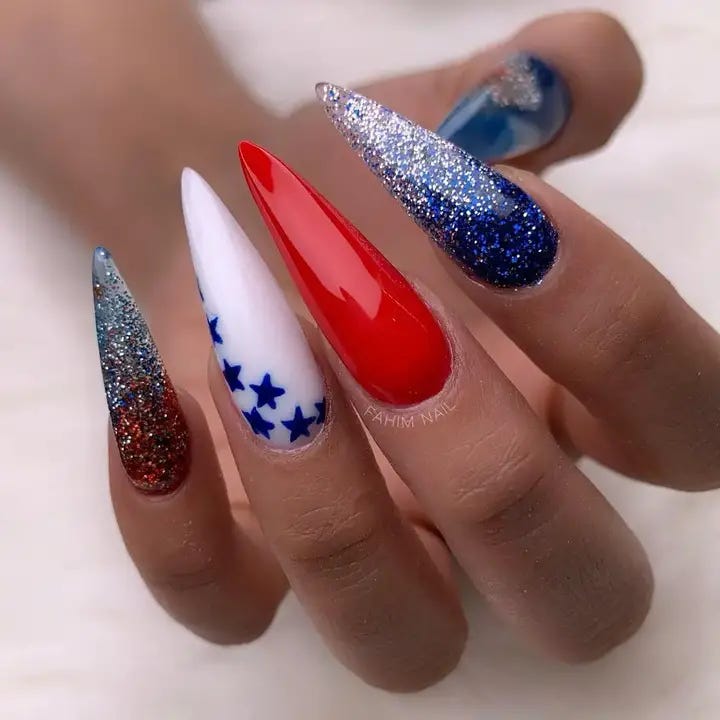
- Base Polish: Sally Hansen Hard as Nails
- Colors: ‘Sapphire Sparkle’, ‘Candy Apple Red’, and ‘Arctic White’
- Glitter: Deep blue glitter mix
- Top Coat: Thick glossy top coat for a voluminous finish
- Tools: Small star stencils, fine-tip brush
Apply the glitter with a sponge for an even, dense coating. Use small star stencils to achieve precise shapes on the white nails for a clean and impactful design.
- Prepare Your Nails: Start with a base coat to protect and strengthen your nails.
- Apply Base Colors: Coat the stiletto nails in red, white, and blue respectively.
- Add Glitter and Stars: For the blue nails, pat on glitter densely. On the white nail, use stencils to add blue stars.
- Finish Up: Apply a layer of glossy top coat to seal the designs and enhance the sparkle.
Fluid Lines And Soft Palettes
This nail design features soft, translucent bases with fluid lines in red and blue, creating a gentle yet dynamic look. The abstract style gives a modern twist to traditional patriotic colors, making it ideal for those seeking a subtle nod to American themes without overt symbolism. This style is suitable for everyday wear or special occasions where a hint of artistry is appreciated.
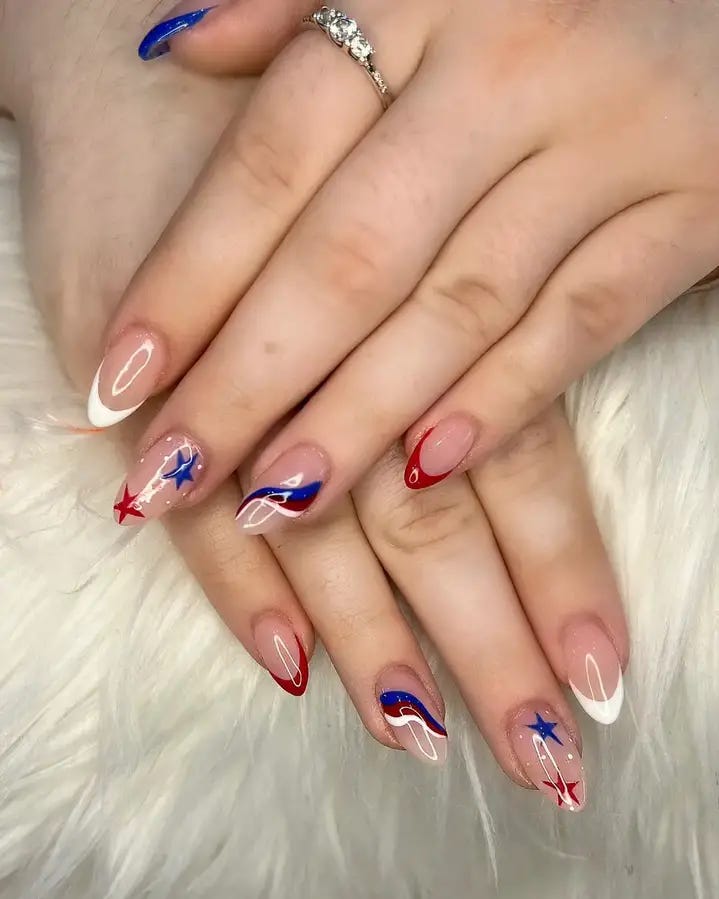
- Base Polish: OPI ProSpa Nail & Cuticle Oil
- Colors: ‘Sheer Pink’, ‘True Blue’, and ‘Rose Red’
- Top Coat: Matte top coat for a contemporary finish
- Tools: Detailing brush, striping tape
Use striping tape to create fluid, clean lines and a detailing brush to fill in colors softly, maintaining the transparency of the base.
- Prepare Your Nails: Apply a nourishing cuticle oil and a clear base coat.
- Apply Base Color: Use a sheer pink as the foundation to enhance the natural look.
- Create Lines and Patterns: With striping tape, layout your designs then paint with blue and red.
- Finish Up: Once dry, remove the tape and apply a matte top coat for a smooth, modern look.
Artistry And Allegiance
This elaborate nail art set is a celebration of American heritage, showcasing an eagle motif amidst a backdrop of stars and stripes. The intricate detailing and use of rhinestones add depth and texture, making this design a standout choice for national holidays or commemorative events. Each nail tells part of a grander story, reflecting pride and artistry.
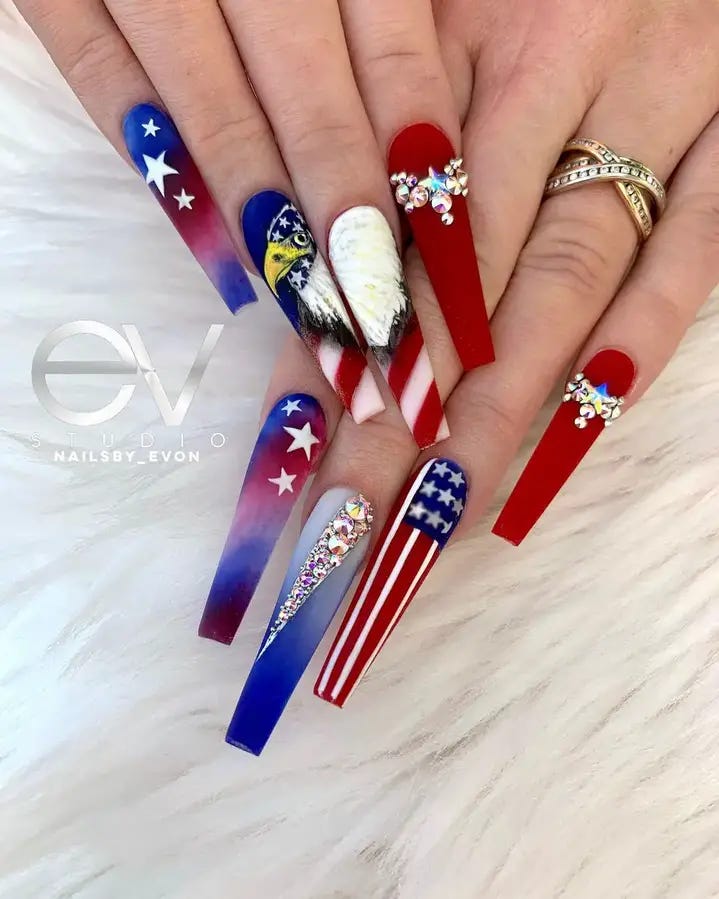
- Base Polish: Essie All in One Base
- Colors: ‘Navy Blue’, ‘Flag Red’, and ‘Alabaster’
- Accents: Rhinestones and micro glitter
- Top Coat: Gel top coat for a durable, shiny finish
- Tools: Fine brushes for detailed art, tweezers for rhinestone application
Approach each nail as a miniature canvas, carefully planning out the placement of each element. Use fine brushes for the detailed eagle and stars, and tweezers to precisely place rhinestones for embellishment.
- Prepare Your Nails: Begin with a protective base coat to ensure longevity.
- Apply Base Colors: Use navy blue as the primary color, with strategic white and red for the American flag motif.
- Detailing: Painstakingly add the eagle and additional stars using a fine brush. Accent with rhinestones for a touch of sparkle.
- Finish Up: Seal your artwork with a gel top coat for a glossy, enduring finish.
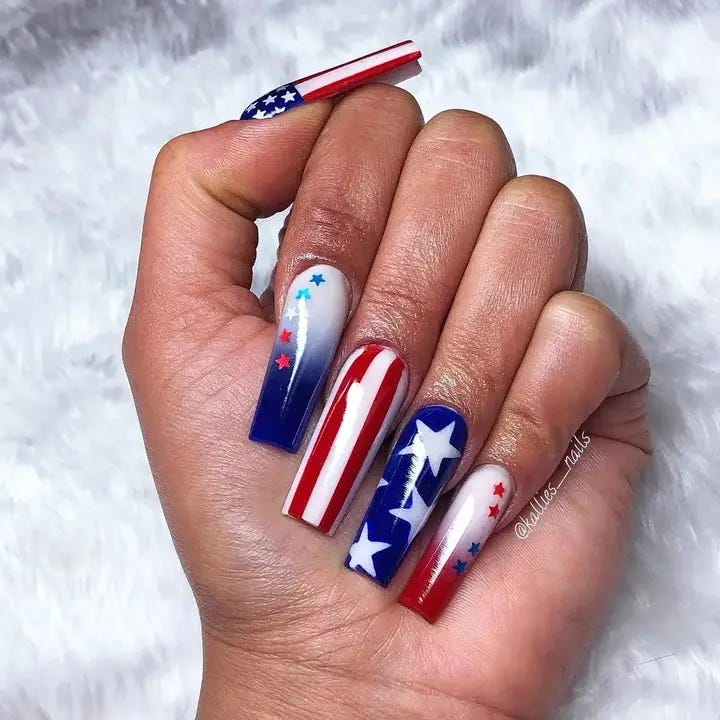
Classic Stripes And Stars
This design is a quintessential celebration of the American spirit, featuring the iconic red and white stripes alongside a deep blue adorned with white stars. The high gloss finish on each nail enhances the vibrant colors, making them stand out boldly. Perfect for national holidays or any occasion where you want to display patriotism with classic flair.
- Base Polish: OPI Natural Nail Base Coat
- Colors: ‘Patriotic Blue’, ‘Flag Red’, and ‘Snow White’
- Top Coat: High-gloss top coat for shine and protection
- Tools: Striping tape, star stencils
Use striping tape to achieve perfect red and white lines and stencils for the stars to maintain symmetry and precision on the blue nails.
- Prepare Your Nails: Apply a base coat to protect your nails and enhance the polish adhesion.
- Apply Base Colors: Paint the thumb and little finger in deep blue, and the remaining fingers in white.
- Design Details: Add red stripes over the white base using striping tape. Apply white stars on the blue nails using stencils.
- Finish Up: Seal your design with a glossy top coat for a lasting finish and vibrant shine.
Gradient Stars
This nail design showcases a modern approach with a smooth gradient transitioning from white to deep blue across the nails, decorated with stars that appear to float across this celestial background. The gradient effect mimics a twilight sky, making it an elegant choice for evening events or as a sophisticated patriotic tribute.

- Base Polish: Essie Here to Stay Base Coat
- Colors: ‘Midnight Blue’ and ‘Pure White’
- Top Coat: Matte top coat for a contemporary finish
- Tools: Sponge for gradient effect, small star stencils
For a flawless gradient, use a sponge to dab and blend the colors gently across each nail. Small stencils will help achieve precise and uniform stars.
- Prepare Your Nails: Start with a base coat for smooth polish application.
- Create Gradient: Apply a base layer of white, then use a sponge to apply ‘Midnight Blue’ from the tip, blending towards the middle.
- Add Stars: Place star stencils randomly and dab white polish to create stars.
- Finish Up: Apply a matte top coat for a modern and elegant finish.
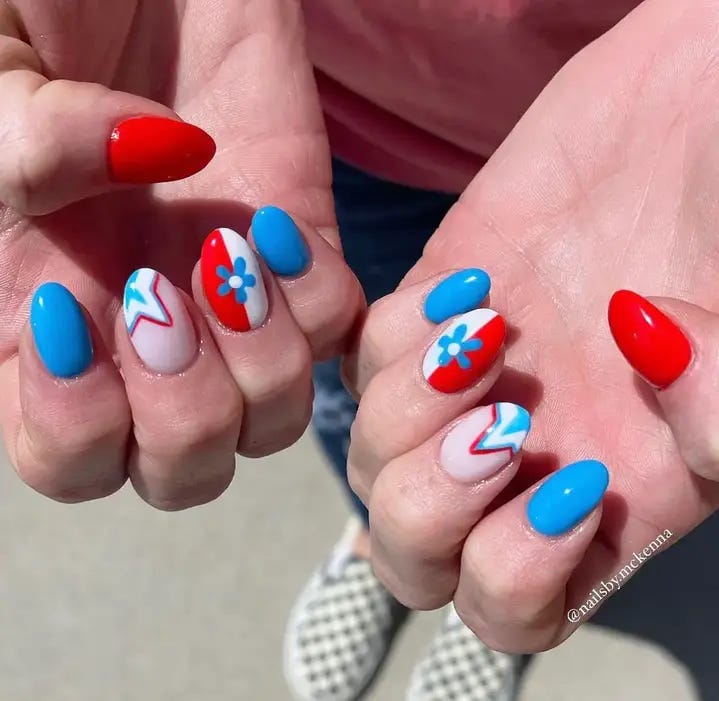
Playful Spring Vibe
Featuring a vibrant palette of blues and reds complemented by playful floral and zigzag patterns, this design infuses a youthful and fresh vibe into traditional patriotic colors. It’s perfect for springtime gatherings, casual outings, or anytime you want to add a pop of color and fun to your look.
- Base Polish: Sally Hansen Double Duty
- Colors: ‘Sky Blue’, ‘Cherry Red’, and ‘Alabaster White’
- Top Coat: Gel top coat for a glossy, plump look
- Tools: Detailing brush, dotting tools
Use dotting tools for precise flower centers and a fine brush for clean zigzag patterns. The gel top coat will add depth and vibrancy to the colors.
- Prepare Your Nails: Apply a base coat to protect your nails and enhance the color.
- Apply Base Colors: Alternate between sky blue and white for your base colors on each nail.
- Add Details: Use a fine brush to create zigzag patterns and dotting tools for floral designs on selected nails.
- Finish Up: Apply a thick layer of gel top coat for a vibrant and durable finish.


0 Comments