Searching for nail art inspiration for summer 2024? Look no further! Dive into our latest collection of fresh and trendy palm tree designs, perfect for the sunny season. These chic and stylish patterns will elevate your summer look, making your nails the ultimate accessory. Whether you're hitting the beach or lounging by the pool, our palm tree nail art ideas will keep you in a tropical state of mind all summer long. Get inspired and let your creativity shine with these summer-ready designs!
Whispering Waves
These nails offer a soft and ethereal take on the palm tree theme, utilizing a blend of sky blue and white to mimic the gentle caress of ocean waves. The delicate palm tree designs are accentuated with subtle black dots, adding a touch of whimsy to the serene aesthetic. This design is perfect for those seeking a minimalist yet distinctly summer vibe.

Materials Needed
- Sky blue and white nail polishes — For the base gradient.
- Black nail polish — For palm details and dots.
- Sponge — For creating the gradient effect.
- Top coat — For a durable and glossy finish.
- Fine brush and dotting tool — For detailed design work.
Recommendations: Use a matte top coat for a unique, soft-focus finish.
Classic Red And White Palms
This design brings a classic color combination of red and white to life with crisp palm tree silhouettes that pop against a white background. It’s a fresh twist on traditional summer themes, offering a bold and graphic look that’s both playful and elegant.
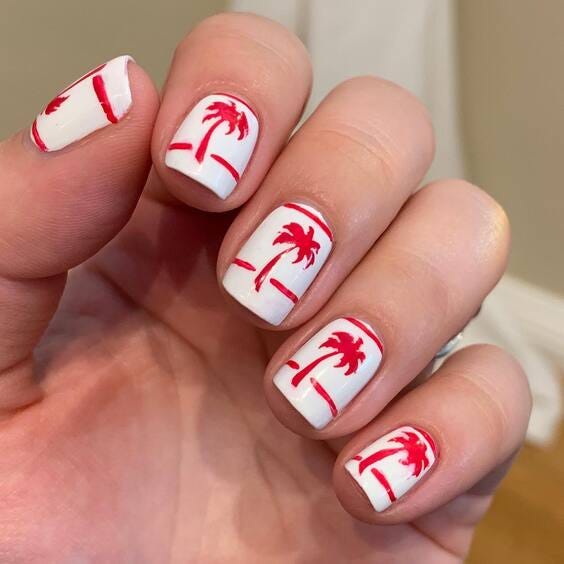
Materials Needed
- White and red nail polishes — For the base and palm designs.
- Top coat — To protect and enhance the artwork.
- Thin brush — For precise application of the palm motifs.
Recommendations: High-opacity polishes work best for this stark color contrast, such as those from the Essie Gel Couture line.
DIY Instructions
Apply two coats of white polish as the base. Use a thin brush to draw the palm trees in red. A steady hand is key for clean lines. Finish with a clear top coat to seal in the design and add gloss.
Sunset Gradient Palms
Featuring a dazzling sunset gradient, these nails are a vibrant canvas showcasing deep pinks and oranges that seamlessly blend into one another, crowned by stark black palm silhouettes. This design is both eye-catching and quintessentially summer, perfect for anyone looking to make a statement with their nail art.
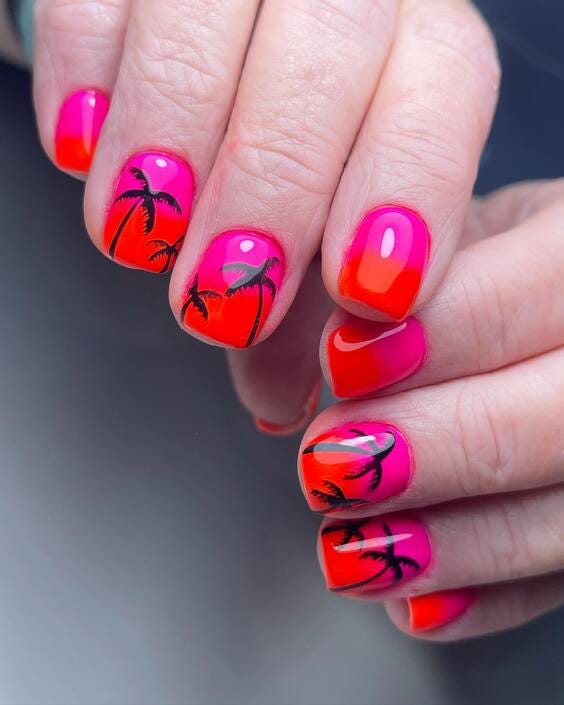
Materials Needed
- Pink and orange nail polishes — For the gradient effect.
- Black nail polish — For the palm tree designs.
- Sponge — To apply the gradient.
- Top coat — For shine and durability.
- Detailing brush — For the palm details.
Recommendations: Opt for neon shades to really make the gradient pop under the summer sun.
DIY Instructions
Start with a pink base, then use a sponge to apply orange polish, blending well at the middle to create a smooth gradient. Use a fine brush to paint the palm trees in black. Finish with a top coat to enhance the colors and ensure the design lasts through your summer adventures.
Playful Character Accent
This nail design introduces a playful twist by combining a classic French tip with whimsical characters and palm tree silhouettes. The inclusion of a popular blue animated character on one nail brings a fun and personalized touch, perfect for those looking to blend classic elegance with a pop of youthful charm.

Materials Needed
- Nude and white nail polishes — For the French tip base.
- Black nail polish — For the palm tree and character details.
- Detailing brush — For intricate designs.
- Top coat — To seal and protect the design.
Recommendations: For the character details, use acrylic paints instead of polish for finer control and vibrancy.
DIY Instructions
Apply a nude base coat followed by white tips. Use a fine brush to draw the palm tree and character on the accent nails. Carefully outline and fill to ensure clarity and brightness. Finish with a clear top coat for a glossy look.
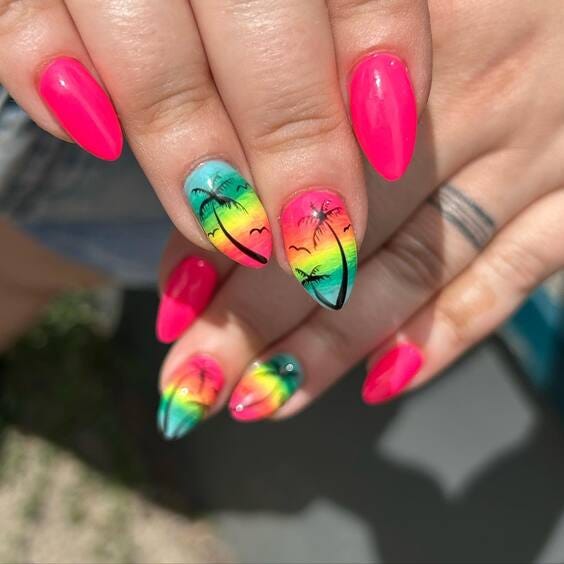
Neon Sunset Palms
This design is a bold statement piece, featuring black palm silhouettes against a vibrant neon sunset background. The high contrast not only highlights the palm trees but also turns the nails into a stunning piece of wearable art, reflecting the fiery colors of a tropical sunset.
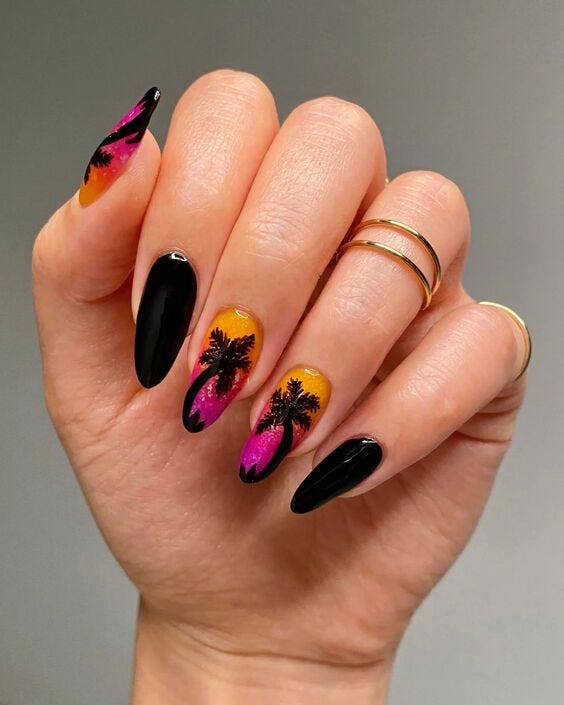
Materials Needed
- Neon pink, orange, and black nail polishes — For the base and designs.
- Sponge — For the gradient effect.
- Top coat — For a smooth, protective finish.
- Fine brush — For the palm details.
Recommendations: Choose neon polishes with a translucent finish for a more vibrant gradient.
DIY Instructions
Start with a base of neon pink at the tips, blending into orange towards the cuticle using a sponge. Once dry, paint the palm silhouettes in black. Apply a top coat to enhance the colors and maintain the design.
Bold Pink And Palm Contrast
In this eye-catching design, bold pink nails are juxtaposed with a soft pink and white geometric background, featuring black palm tree silhouettes. This combination of vivid color and subtle design elements creates a modern, fashion-forward look ideal for summer events.
Materials Needed
- Bold pink and soft pink nail polishes — For the color blocks.
- White nail polish — For the geometric background.
- Black nail polish — For the palm tree designs.
- Tape or stencils — For precise geometric shapes.
- Top coat — For durability and shine.
Recommendations: Use tape to create sharp lines and shapes for the geometric design.
DIY Instructions
Apply bold pink on the majority of the nails. For the accent nails, start with a white base and use tape to create triangular and diagonal shapes with soft pink. Paint the palm trees in black over the geometric design. Finish with a top coat to ensure the design stays pristine.
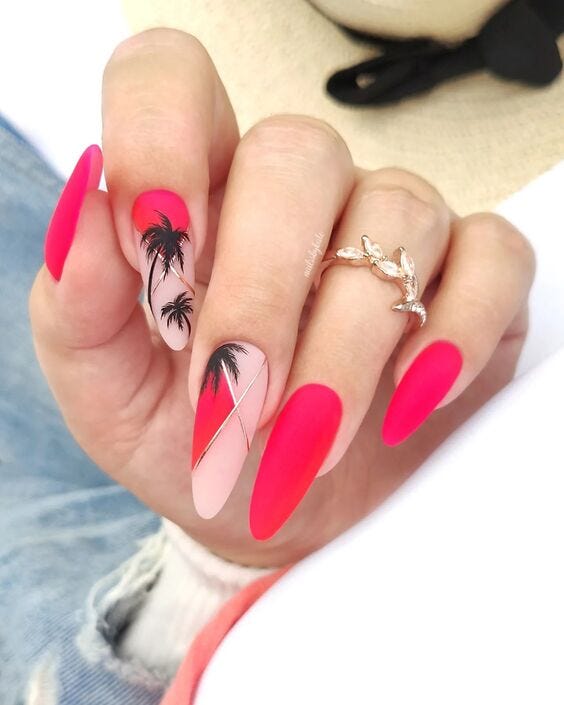
Vibrant Pink Glow
This stunning nail design boasts a radiant pink glow with dynamic accents, including gemstones and a unique palm tree silhouette against a sunset background. The use of vibrant pink shades creates an energetic and bold look, perfect for summer festivities.
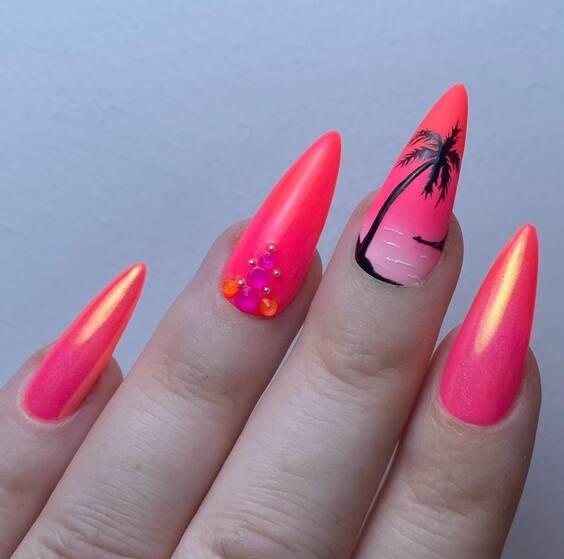
Materials Needed
- Neon pink nail polish — For the base color.
- Black nail polish — For the palm silhouette.
- Various gemstones — For added sparkle.
- Top coat — To secure the gemstones and enhance the overall look.
- Detailing brush — For the palm tree design.
Recommendations: Use a gel top coat to ensure the gemstones adhere well and the polish remains vibrant longer.
DIY Instructions
Apply a neon pink polish as the base. Use a detailing brush to paint a palm tree silhouette on one nail. Add small gemstones to another nail for a decorative touch. Seal everything with a gel top coat for a glossy finish and added durability.
Neon Palms
This design marries the boldness of neon with the elegance of palm trees. Each nail is a canvas displaying vibrant neon shades that transition via a sponging technique, adorned with a palm tree silhouette. The use of bright pink and the word “PINK” gives it a distinctly youthful and trendy vibe, making it a perfect choice for fashion-forward nail enthusiasts.
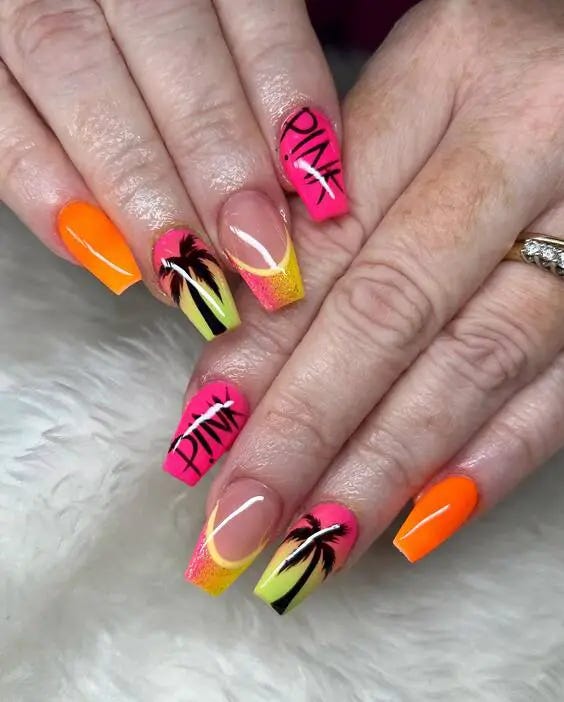
Materials Needed
- Neon pink, yellow, and orange nail polishes — For the base gradient.
- Black nail polish — For the palm tree designs.
- Sponge — For a smooth gradient effect.
- Top coat — For a lasting finish.
- Fine brush — For the lettering and palm details.
Recommendations: Opt for a sponge with a fine pore structure for a smoother gradient transition.
DIY Instructions
Start with a white base coat to make the neon colors pop. Apply neon polishes on a sponge and dab onto the nails for the gradient effect. Use a fine brush to draw the palm trees and the word “PINK” on each nail. Finish with a top coat to ensure longevity and gloss.
Tropical Night Sky
This set of nails features a mesmerizing night sky theme intertwined with palm silhouettes, offering a unique take on the typical sunny palm tree motif. The use of blue and yellow gradients symbolizes the sky at dusk with twinkling stars, while the dark blue palms add a shadowy mystery, reminiscent of a quiet, starry night on a tropical island.
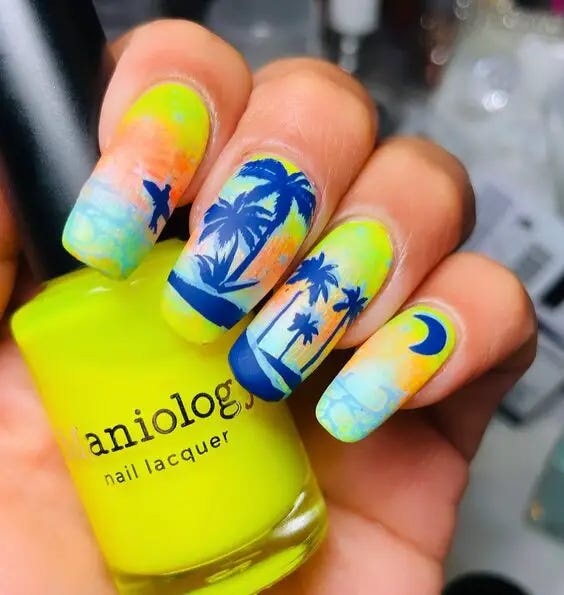
Materials Needed
- Yellow, blue, and black nail polishes — For the background and details.
- Glitter top coat — To simulate stars.
- Fine brush — For painting detailed palm trees and moon.
- Sponge — For creating the gradient sky effect.
Recommendations: Choose a high-quality glitter top coat for a realistic starry effect, such as the OPI Starlight Collection.
DIY Instructions
Begin with a yellow base, and sponge on blue to create a gradient effect for the dusk sky. With a fine brush, paint the palm trees in dark blue. Add subtle touches of a glitter top coat for stars. Finish with a clear top coat to seal in the design.
Serene Blue Palms
Capturing the tranquil hues of a clear sky, this design utilizes shades of blue to craft a serene palm tree scene. The gradual transition from a soft sky blue at the base to a deeper midnight blue at the tips serves as a perfect backdrop for the black palm silhouettes. This color scheme not only reflects the calm of the ocean but also adds a sophisticated touch to the classic palm tree motif.
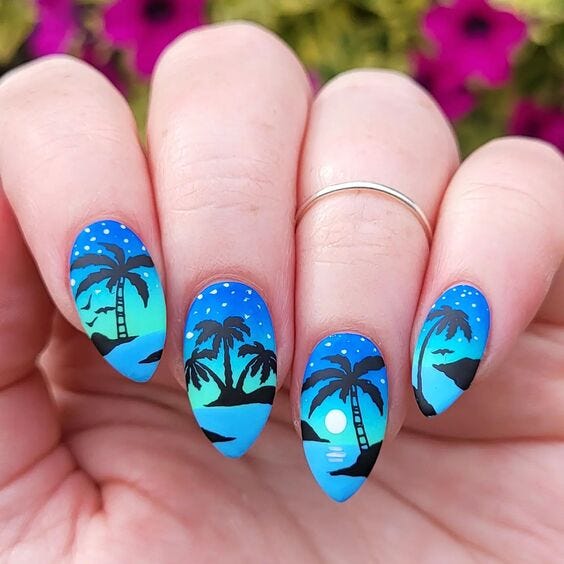
Materials Needed
- Sky blue and midnight blue nail polishes — For the gradient effect.
- Black nail polish — For the palm silhouettes.
- Sponge — To blend the gradient.
- Top coat — For a smooth, finishing shine.
- Detailing brush — For intricate palm outlines.
Recommendations: For best results, use a sponge with small pores to achieve a flawless gradient.
DIY Instructions
Begin with a base coat of sky blue. Gradually sponge on midnight blue from the tip towards the middle to create a smooth gradient. Once dry, use a detailing brush to paint the palm silhouettes in black. Seal with a top coat for durability and gloss.
Sunset Palms Delight
This nail design combines the warmth of a sunset with playful pastels, creating a cheerful and inviting summer vibe. The gradient background, featuring yellows and pinks, mimics the colors of a sunset sky, while the palm tree silhouettes in black add a dramatic contrast. This design is perfect for those who love a pop of color with their summer wardrobe.
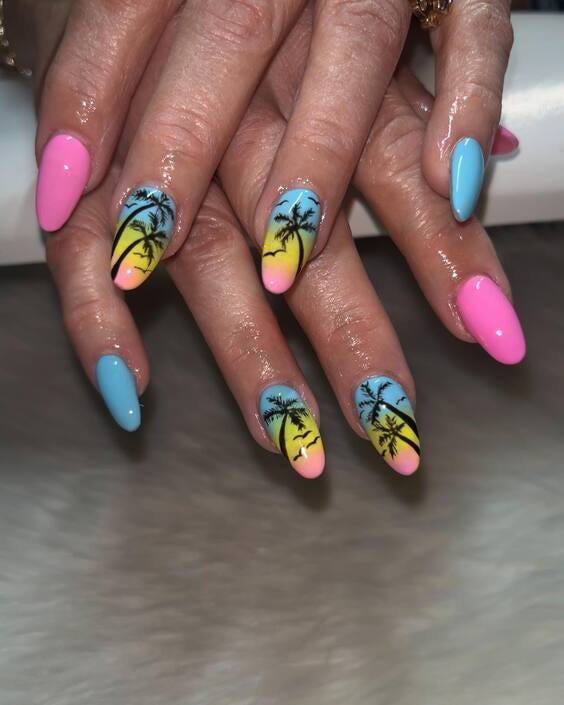
Materials Needed
- Pink and yellow nail polishes — For the sunset gradient.
- Black nail polish — For the palm details.
- Sponge — For applying the gradient.
- Top coat — To enhance and protect the design.
- Fine brush — For detailed palm painting.
Recommendations: A glossy top coat will enhance the sunset colors, making them even more vibrant.
DIY Instructions
Apply a light pink base, then use a sponge to create a gradient with yellow at the nail base, blending up to pink at the tips. Paint the palm silhouettes with a fine brush. Finish with a glossy top coat to make the colors pop.
Neon Rainbow Palms
Vibrant and bold, this design is a true celebration of color. Utilizing a rainbow gradient as the base, each nail features a silhouette of a palm tree that seems to sway with the breezes of summer. The addition of neon colors brings a modern twist to the classic palm tree design, making it perfect for festivals, beach outings, and summer parties.
Materials Needed
- Neon nail polishes (various colors) — For the base.
- Black nail polish — For the palm tree silhouettes.
- Sponge — To apply the gradient.
- Top coat — For lasting shine and protection.
- Detailing brush — For the palms.
Recommendations: Use neon polishes that are known for their brightness and longevity to keep the look vibrant all day.
DIY Instructions
Start with a white base coat to intensify the neon colors. Apply different neon polishes on a sponge and dab onto the nails to create a gradient. Once dry, use a detailing brush to paint black palm tree silhouettes. Seal the design with a top coat to maintain the neon brightness and detail sharpness.


0 Comments