Artistic Flair: Short Summer Nails with Unique Art Ideas. Summer 2024 is all about expressing your creative side with unique art ideas on short summer nails. From playful beach art to elegant abstract designs, there’s no limit to what you can showcase on your nails. Experiment with bright gel colors and intricate designs to make your manicure a personal piece of art, reflecting your summer vibes and experiences.
Advertisement
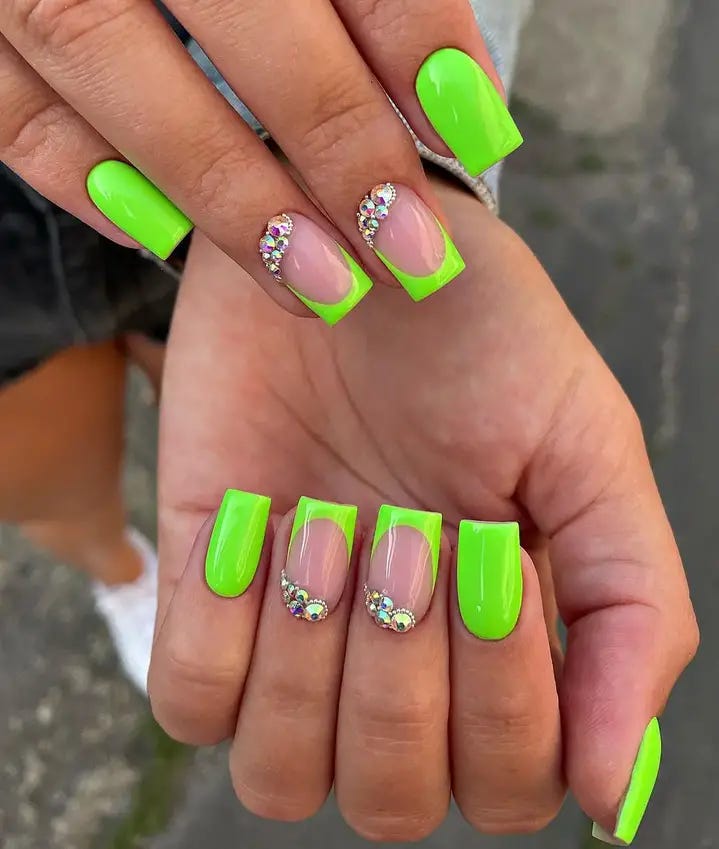
Bright Green Nails With Jeweled Cuticle Accents On Sheer Pink Bases
When you’re aiming for bright, go all out with neon green! This manicure turns heads with its electric hue, made even more captivating by the half-moon nail art with rhinestone embellishments. It’s perfect for those summer concerts or just to add an edge to your everyday style.
Advertisement
Consumables for Creating Neon Green Nails:
- Base Coat: Gelish Foundation Base Gel
- Neon Green Gel Polish: Gelish “Lime All The Time”
- Rhinestones: Mixed Sizes for the sparkling half-moon
- Top Coat: Gelish Top It Off Gel Polish for a high-gloss finish
Crafting Neon Green Nails at Home:
Prep your nails and apply the base gel. Once cured, go for two vibrant layers of neon green. For the half-moons, apply a thin layer of top gel where you want your rhinestones, cure briefly, then place your stones. Finish with a final cure for nails that say “look at me!”
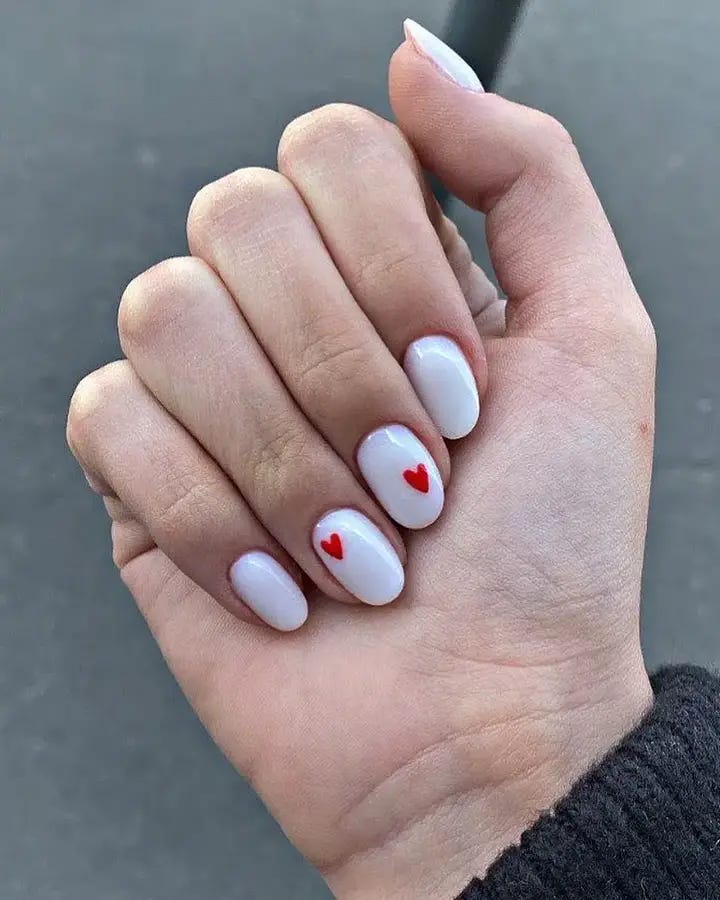
White Nails With Small Red Heart Accents
Simple yet undeniably sweet, this manicure showcases a clean white canvas punctuated by tiny red hearts. It’s a subtle nod to romance that pairs effortlessly with any summer outfit, keeping things light, fresh, and utterly adorable.
Advertisement
Consumables for Creating Heart Accent Nails:
- Base Coat: Zoya Anchor Base Coat
- White Polish: China Glaze White on White
- Red Accents: OPI Nail Lacquer in “Big Apple Red”
- Top Coat: INM Out The Door Super Fast Drying Top Coat for a quick finish
Heart Accent Nail Art Made Easy:
Start with a smooth base coat followed by the stark white polish. Use a fine brush to paint petite hearts with “Big Apple Red”. Don’t fret over perfection; the charm is in the handmade touch. Seal it with a quick-drying top coat, and your nails are ready to flirt with the summer breeze.
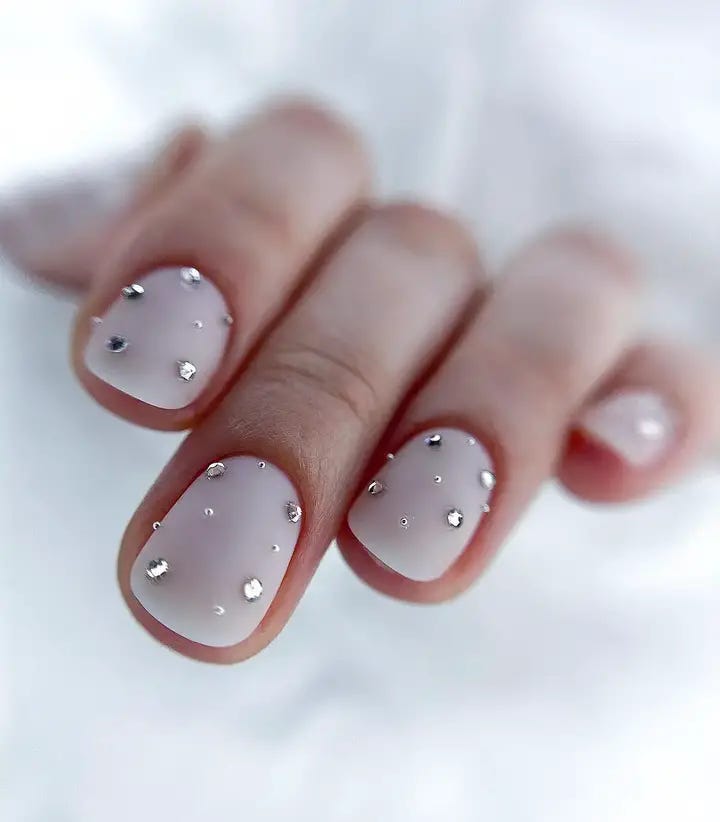
Sheer Nails With Scattered Rhinestone Accents
A whisper of natural beauty comes through in this design, where simple is the new exquisite. Tiny gems sparkle like morning dew against a sheer pink backdrop, creating a look that’s understated yet luxurious. The round nails suggest a softness that’s both inviting and intriguing.
Advertisement
Consumables for Creating Subtle Sparkle Nails:
- Base Coat: Deborah Lippmann All About That Base
- Sheer Pink Polish: OPI Nail Lacquer in “Bubble Bath”
- Gemstones: Tiny Crystal Clear Nail Art Rhinestones
- Top Coat: Essie Gel Setter Top Coat
Home Crafting the Sparkling Sheer Look:
Prepare nails with the base coat followed by two coats of OPI’s “Bubble Bath” for that perfect pink sheen. Strategically place rhinestones in a gentle curve on each nail, using a dab of top coat to affix them. Seal the design with a final layer of top coat for a glossy finish that protects your gems.
White Nails With Silver Glitter Encapsulated Tips
Icy textures meet short nails in a design that’s as cool as a summer evening. This manicure’s frosted glass effect pairs beautifully with an oval shape, offering a modern twist on the natural nail. The sparkle from within the texture catches the light, mimicking a frosty cocktail glass.
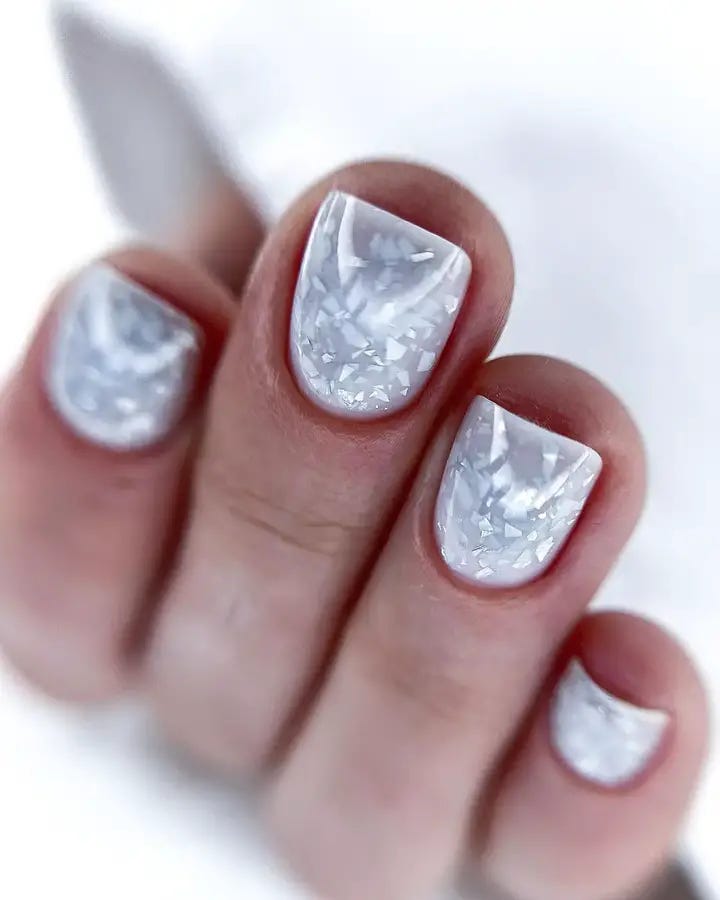
Consumables for Creating the Frosted Glass Manicure:
- Base Coat: OPI Natural Nail Base Coat
- Frosted Polish: Sally Hansen Frosted Matte Top Coat
- Top Coat: INM Out The Door Top Coat for a quick-drying finish
DIY the Frosted Look:
After a base coat, apply a coat of your preferred sheer polish. Then, work with the frosted matte top coat to achieve the glass effect. A steady hand and patience are key. Once dry, a top layer of glossy top coat gives it a unique texture that’s smooth to the touch but icy to the eye.
Manicure With A Golden Foil Accent On The Ring Finger
This modern take on the French manicure fuses classic almond shapes with a luxurious edge. A thin stripe of gold against a nude polish creates a manicure that’s simple yet impactful, perfect for the woman who commands attention with a whisper rather than a shout.
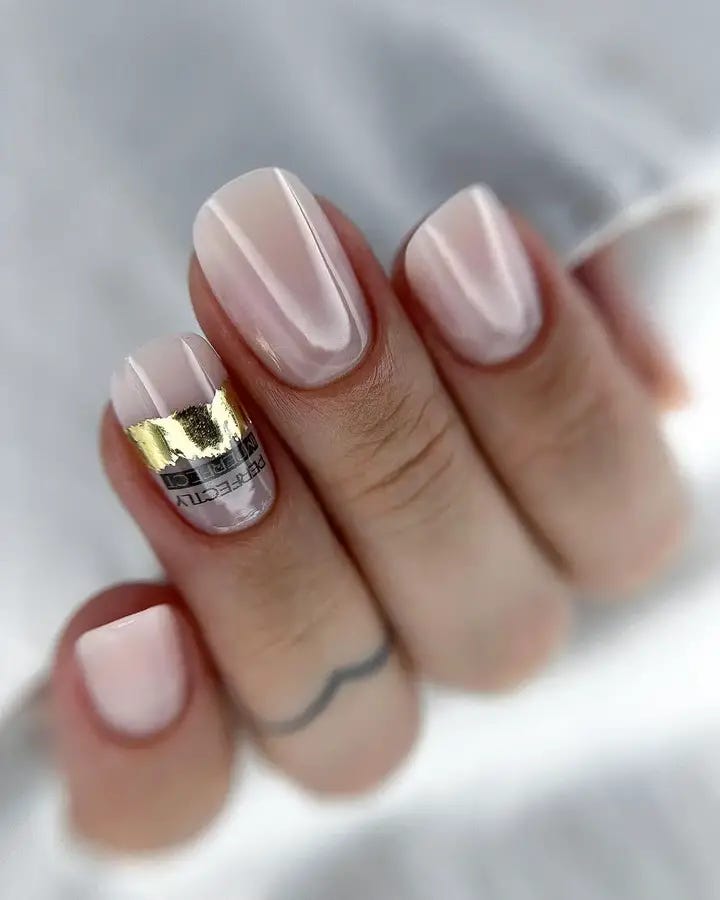
Consumables for Creating Golden Edged Nails:
- Base Coat: Butter LONDON Nail Foundation Priming Basecoat
- Nude Polish: Essie “Topless & Barefoot”
- Gold Leaf: Gold Leaf Sheets for Nail Art
- Top Coat: Deborah Lippmann Gel Lab Pro Top Coat
Mastering the Golden Touch at Home:
Lay down a solid base, then two coats of “Topless & Barefoot” for a flawless nude. Apply adhesive for the gold leaf at the tips, and gently press on the gold leaf. Seal with a gel-like top coat for a smooth, lasting finish that’s as regal as it is refreshing.
Golden Textured Metallic Nails With One Black Accent Nail
Boldness meets luxury in this audacious manicure that’s not afraid to shine. The rich gold leaf texture against a sleek black accent nail is a testament to the art of contrast and the allure of opulence. These nails are the gold standard for statement 2024 long nails and are sure to be a showstopper.
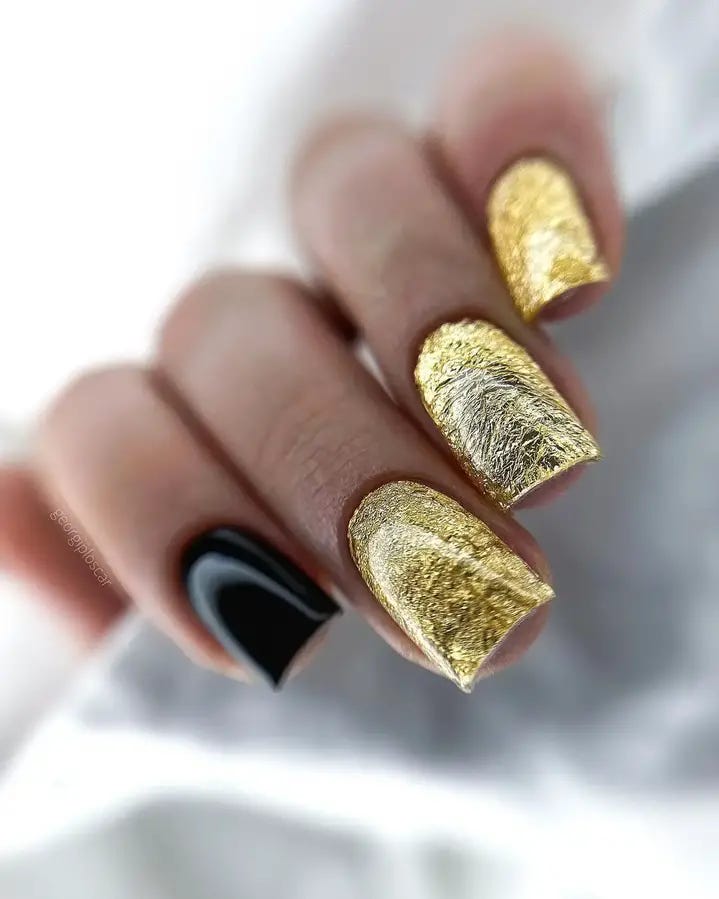
Consumables for Creating Luxe Metallic Nails:
- Base Coat: Smith & Cult Basis of Everything Base Coat
- Black Polish: Cirque Colors Crème Nail Polish in “Memento Mori”
- Gold Leaf: 24k Gold Leaf Sheets for Nail Art
- Top Coat: ILNP Ultra Glossy Seal
Crafting the Golden Glamour:
Begin with a pristine base, followed by a coat of the boldest black you own. Apply adhesive to the nails destined for gold, then press the gold leaf sheets gently on top. The black nail remains solid as an anchor to the design. Seal with a glossy top coat to ensure your nails are nothing short of extraordinary.
Sheer Pink Ombre Nails With White Floral Stamping
Let your nails bloom with the tropical essence of summer with this vibrant hot pink and white design. It’s like a summer garden party on your fingertips, bringing together bold colors and delicate art in a seamless dance of vibrancy and grace. Perfect for beach days or summer escapades, these nails are a conversation starter.
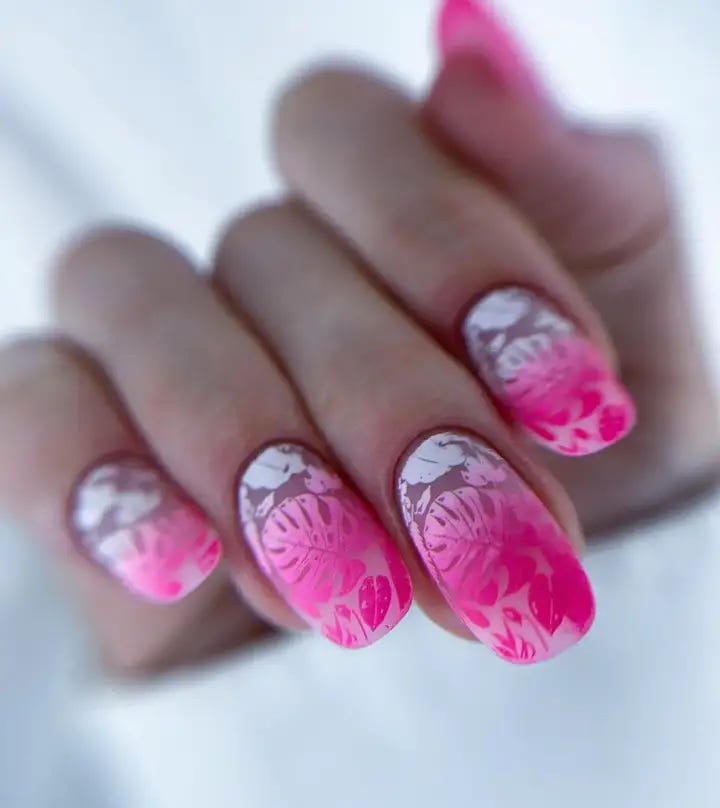
Consumables for Creating Tropical Art Nails:
- Base Coat: ORLY Bonder Rubberized Basecoat
- Pink Gradient Polish: OPI Neon Collection — “Down to the Core-al”
- White Stamping Polish: Konad Nail Art Stamping Polish
- Stamping Plate: Bundle Monster “Tropical Vibes”
- Top Coat: Seche Vite Dry Fast Top Coat
Nailing the Tropical Design:
Start with the bonder, then sponge on the pink gradient for a sunset effect. Once dry, use the stamping plate to transfer your white tropical design. Finish with a swift stroke of Seche Vite to capture the vibrancy beneath a glossy seal.
Nails With Iridescent Pink
Delight in the soft playfulness of pastel iridescence, where each finger captures the ethereal glow of a different summer dawn. A star accent brings a touch of sparkle, making this manicure perfect for those who prefer their style with a hint of fantasy. It’s a gel look that’s in vogue, capturing the essence of 2024 gel short nails.
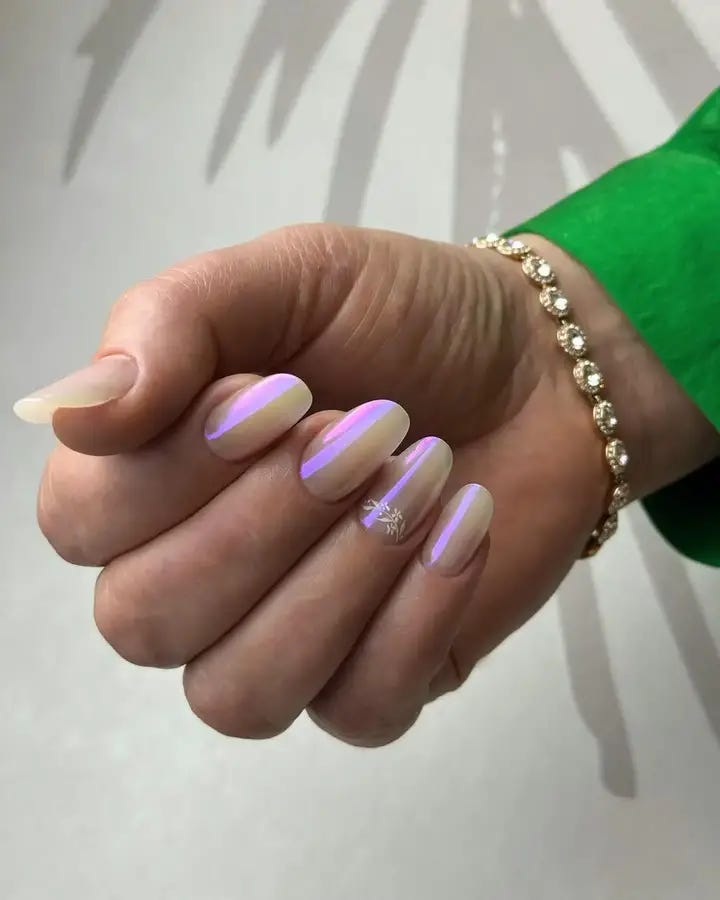
Consumables for Creating Iridescent Pastel Nails:
- Base Coat: Zoya Anchor Base Coat
- Pastel Gel Polishes: Gellen Gel Nail Polish Kit “Pastel Series”
- Holographic Top Coat: INM Northern Lights Holographic Top Coat Silver
- Star Rhinestone: Silver Star Nail Art Studs
Creating Iridescent Nails at Home:
Lay the anchor, then layer on the pastel gels lightly for that soft-focus effect. Apply the holographic top coat for a mesmerizing sheen. Affix a single star stud as an accent, and encase the dreamy design with a final top coat layer, for nails that are both striking and subdued.
Pink Nails With White Geometric Lines And Rhinestone Accents
Flowing with the serenity of summer breezes, this nail art design features delicate white lines rippling across a soft pink canvas. It’s like gazing at gentle waves reflecting the sun’s soft glow, a design that’s both soothing and sophisticated. Adding tiny gemstone accents brings a touch of sparkle, capturing the playful twinkle of sunlight on water.

Consumables for Creating The White Wave Design:
- Base Coat: CND Stickey Base Coat
- Pink Polish: OPI “Put it in Neutral”
- White Art Liner: Sally Hansen Nail Art Pen in White
- Gemstones: Small Round Crystal Embellishments
- Top Coat: INM Out The Door Super Fast Drying Top Coat
Creating the White Wave at Home:
After your base coat, apply a couple of layers of OPI’s “Put it in Neutral” for that perfect pink base. Use the white nail art pen to draw your lines with a light hand, mimicking the ebb and flow of the tide. Place a gemstone at the crest of select waves, then seal it all with a fast-drying top coat for lasting wear.
Nude Nails With Minimalistic Red Art
This playful, abstract floral design is a love letter to the unstructured beauty of nature. Vibrant colors play across a nude base, creating an art piece at your fingertips. It’s a fresh take on floral, perfect for those who wear their creativity as openly as their favorite summer dress.

Consumables for Creating Abstract Florals:
- Base Coat: Essie Here to Stay Base Coat
- Nude Polish: Zoya “April”
- Colored Art Liners: A variety of bright nail art pens or brushes with acrylic paints
- Top Coat: ORLY Glosser Super High-Shine Top Coat
Bringing the Florals to Life:
A solid base coat is followed by the neutral “April”. Then, with an array of colorful pens or brushes, freely sketch your abstract florals. This is where your inner artist shines, with no two nails the same. Gloss it over with ORLY’s high-shine top coat for a durable, glossy finish.
Sheer Pink Nails With White Flowers And Gold Glitter Accents
Combining the timeless elegance of white with the luxury of gold, this design is a true classic with a twist. Golden blossoms rest on a backdrop of transparent pink, bringing an air of romance and sophistication to any ensemble. It’s perfect for summer weddings or simply to add a touch of class to your everyday style.
Consumables for Creating Golden Blossoms:
- Base Coat: Orly Bonder Basecoat
- Sheer Pink Polish: Essie “Sugar Daddy”
- Gold Flake Polish: ILNP “The Magician”
- White Stamping Polish: Mundo de Uñas White
- Stamping Plate: MoYou London “Floral”
- Top Coat: Essie Gel Setter Top Coat
Fashioning the Floral Gold:
Prep your nails with the Orly Bonder, then apply “Sugar Daddy” for that perfect sheer hint of pink. Apply “The Magician” to the areas where you’ll stamp your white florals from MoYou’s “Floral” plate. Delicately press the gold flakes onto the stamped areas for a majestic finish. Gloss over everything with Essie’s Gel Setter for a smooth and lustrous look.
Varied Nail Art Featuring An Eye Design, White Florals, And A Jeweled Accent
This design takes a bold leap into the artistic unknown, blending an illustrative eye with floral patterns and a dash of rhinestone sparkle. It’s a narrative piece, a nail that tells a story and captures the imagination. Each element adds its voice, from the whimsical flowers to the protective eye.
Consumables for Creating Artful Gaze Nails:
- Base Coat: OPI Infinite Shine Primer
- Nude Polish: OPI “Be There in a Prosecco”
- Artistic Detail Paints: Black and White Acrylic Paint for detailed drawing
- Rhinestones: Assorted Sizes for embellishments
- Top Coat: OPI Infinite Shine Gloss
Designing the Narrative Nails:
Prep with the primer and apply a couple of coats of “Be There in a Prosecco” for a creamy base. Carefully paint the eye and florals with acrylics, allowing each detail to shine. Strategically place rhinestones for a three-dimensional effect. Finish with the gloss top coat for a story that lasts.
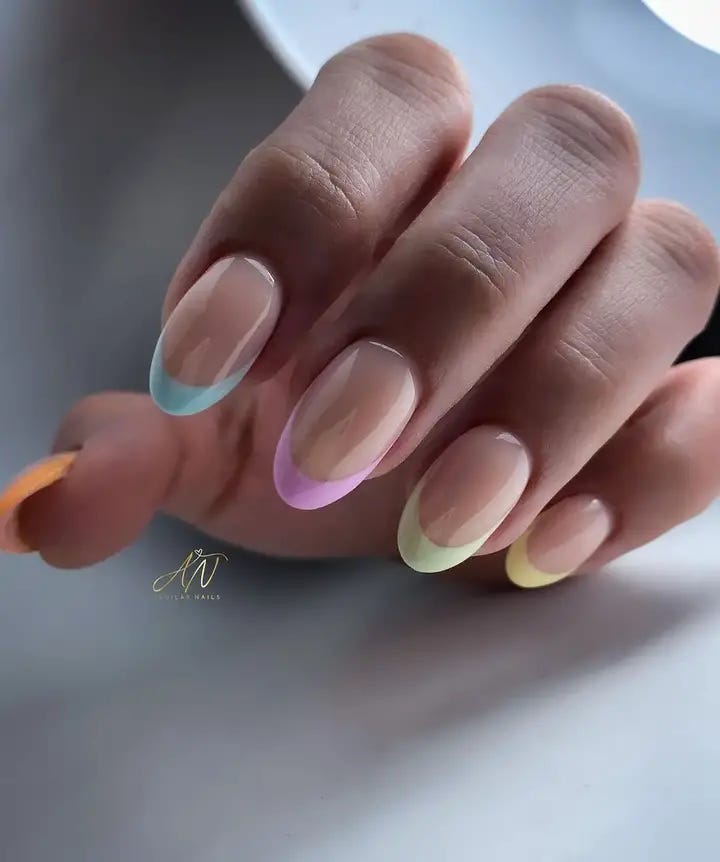
Sheer Base And Colorful French Tips In Pastel Shades
Ombre has never been so serene. This design fades from clear to soft pastel hues, reminiscent of the most gentle sunrise. It’s for those who love to carry a piece of the early morning sky with them, a touch of dawn on their fingertips. The gradient is subtle, almost ethereal in its transition.
Consumables for Creating Pastel Dream Nails:
- Base Coat: Butter LONDON Nail Foundation Priming Basecoat
- Pastel Polishes: Essie Spring Collection
- Sponge: For gradient application
- Top Coat: Smith & Cult Above it All Top Coat
Crafting the Ombre Effect:
Lay down your priming basecoat, then apply a clear polish as a base for your gradient. Using a sponge, dab on the pastel polishes, blending each color softly into the next. Once satisfied with the ombre effect, seal with the high-performance top coat for enduring beauty.
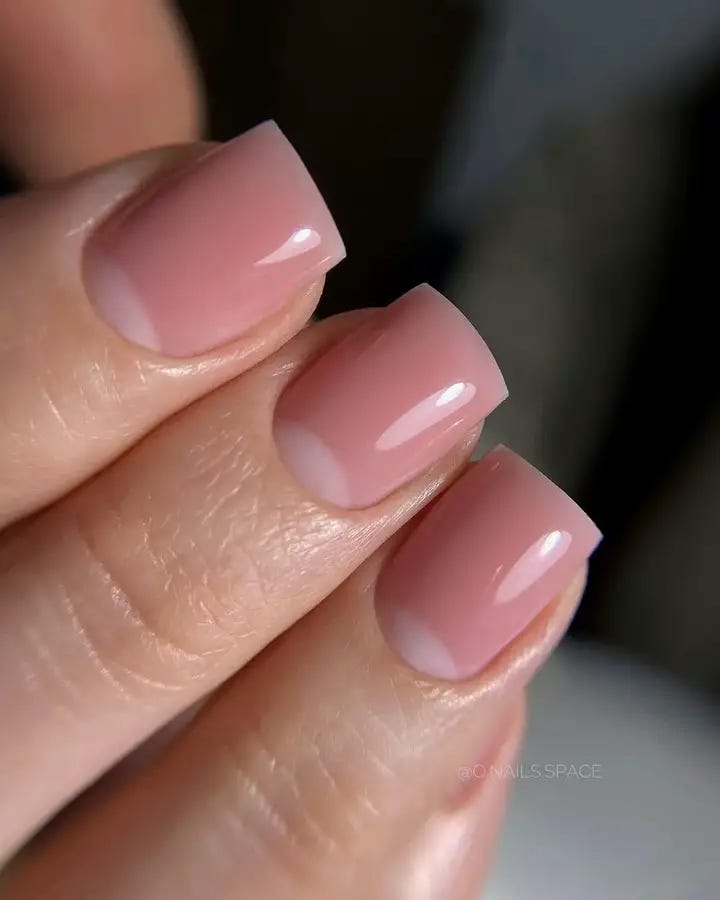
Simple, Glossy, Pale Pink Square-Shaped Nails
Sometimes beauty lies in simplicity, and this classic pink polish speaks of timeless femininity. The rich, self-leveling formula of the polish provides a smooth, impeccable finish. It’s a manicure that embraces tradition and whispers of an understated elegance that never goes out of style.
Consumables for Creating Timeless Elegance Nails:
- Base Coat: Chanel La Base
- Pink Polish: Dior “Tra-La-La” 155
- Top Coat: Chanel Le Gel Coat Longwear Top Coat
Embracing the Classic Manicure:
A luxurious base coat starts the process, preparing the nail for the iconic “Tra-La-La” polish. Two coats achieve the perfect depth of color. The manicure is crowned with the high-gloss longwear top coat, ensuring your nails are as enduring as they are elegant.
Classic Glossy Deep Maroon Nails
This sumptuous deep burgundy gel manicure brings forth the elegance of a velvet evening gown, perfect for those sophisticated summer nights. The color’s rich depth provides a striking contrast to the short, natural shape of the nails, offering a modern twist to classic elegance.
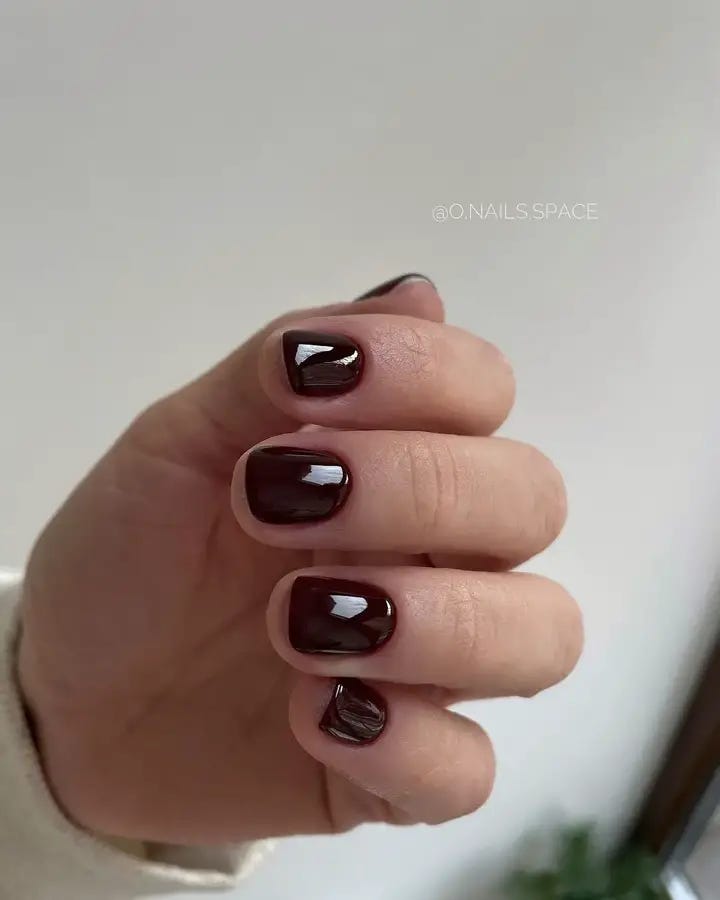
Consumables for Creating Deep Burgundy Nails:
- Base Coat: Sally Hansen Miracle Gel Base Coat
- Burgundy Gel Polish: OPI Gel Color in “Malaga Wine”
- Top Coat: Sally Hansen Miracle Gel Top Coat
Painting the Velvet Night:
After a solid base coat, layer on “Malaga Wine” to achieve that luxurious burgundy depth. Two coats should suffice for full coverage. Seal with a gel top coat for a glossy, durable finish that’s as lustrous as the night sky.
Black Nails With A Leopard Print Design
Unleash your inner wild side with a sophisticated twist using this leopard print design. The print’s timeless allure is offset by its placement on a matte background, creating a compelling contrast that’s both daring and refined — a fierce choice for those who command attention without a roar.

Consumables for Creating Leopard Print Nails:
- Base Coat: Essie Matte About You
- Black and Gold Polishes: For the leopard spots
- Dotting Tools: To create the perfect spots and accents
- Top Coat: Matte Finish to preserve the subdued look
Creating the Leopard Effect:
Apply a matte base coat, then use a fine dotting tool to place your leopard spots in black and gold. For a more subdued look, use a matte top coat to keep the finish understated. Each spot is an individual mark of your personal style statement.
Almond-Shaped Nails With A Glossy Chocolate Brown Finish
The almond nail shape has stood the test of time for its feminine and elongating qualities. Paired with a timeless burgundy shade, it becomes the epitome of elegance. This look is for the one who respects the classics and wears them with innate confidence.
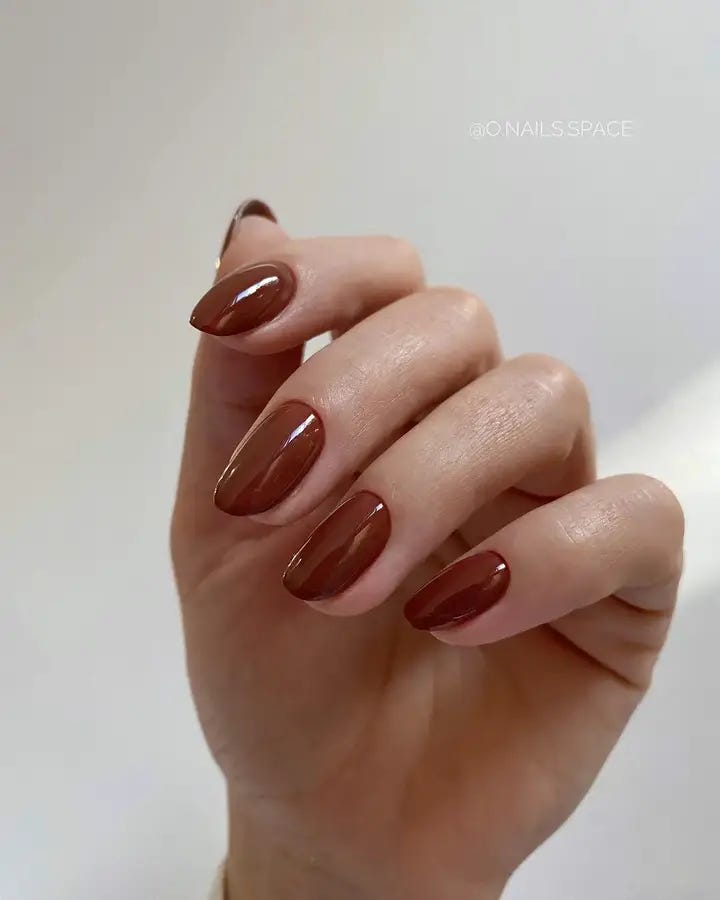
Consumables for Creating Classic Almond Burgundy Nails:
- Base Coat: OPI Natural Nail Base Coat
- Burgundy Polish: OPI “Got the Blues for Red”
- Top Coat: Seche Vite Dry Fast Top Coat
Crafting the Almond Elegance:
Start with a natural base coat, follow with two coats of “Got the Blues for Red” for a rich burgundy color, and complete the look with a quick-drying top coat to ensure your nails are ready for any sophisticated encounter.
Vintage Floral And Cupid Print Designs, Edged With Gold
This manicure speaks of the past with a modern twist, featuring delicate Victorian floral decals on a subtle pink base. The ring finger stands out with its golden framing, hinting at a picture from an antique locket. This design is a poetic nod to nostalgia, perfect for those who cherish the romance of history.
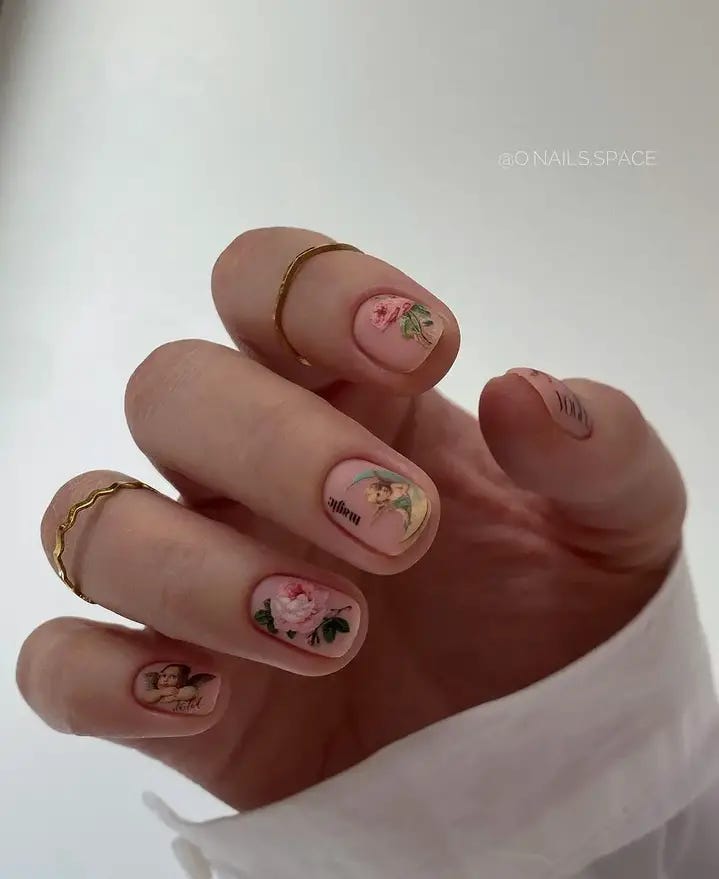
Consumables for Creating Victorian Flora Nails:
- Base Coat: Essie Strong Start Base Coat
- Pink Polish: Essie “Mademoiselle”
- Floral Decals: Vintage Floral Nail Stickers
- Gold Paint: For the ring finger’s delicate frame
- Top Coat: Sally Hansen Miracle Gel Top Coat
Recreating the Vintage Charm:
Prep with the base coat, followed by a sheer layer of “Mademoiselle”. Apply the floral decals carefully, ensuring they lie flat against the nail. Use a fine brush to paint a golden frame on the accent nail. Seal everything with a glossy top coat for a finish that is both durable and enchanting.


0 Comments